[NODEJS] EXPRESS(node.js) to WebSocket 세션 공유

EXPRESS(node.js) to WebSocket 세션 공유

Express로 웹서버 생성 후 서버 및 세션정보를 WebSocket으로 전달
WebSocket 서버 생성 시 verifyClient 옵션으로 세션 처리

server.ts

1
2
3
4
5
6
7
8
9
10
11
12
13
14
15
16
17
18
19
20
21
22
23
24
25
26
27
28
29
30
31
32
33
34
35
36
37
38
39
40
41
42
43
44
45
46
47
48
49
50
51
52
53
54
55
56
57
58
59
60
61
62
63
64
65
66
67
68
69
70
71
72
73
74
75
76
77
78
79
80
81
82
83
84
85
import bodyParser from "body-parser";
import cors from "cors";
import express from "express";
import http from "http";
import methodOverride from "method-override";
import morgan from "morgan";
import session from "express-session";
import passport from "passport";
import path from "path";

import { WS } from "./app/ws";
.
.
.
export class Server {
/* private static ConnectDB(): Promise<any> {
return Connection;
} */
private readonly app: express.Application;
private readonly server: http.Server;

constructor() {
this.app = express();
this.server = http.createServer(this.app);
}

.
.
.

private ExpressConfiguration(): void {
// const RedisStore = connectRedis(session);
const cookieOptions = {
maxAge: 1000 * 60 * 60,
// secure:true, 브라우저가 HTTPS를 통해서만 쿠키를 전송하도록 합니다.
httpOnly: false,
// 쿠키가 클라이언트 JavaScript가 아닌 HTTP(S)를 통해서만 전송되도록 하며, 이를 통해 XSS(Cross-site scripting) 공격으로부터 보호할 수 있습니다.
};
const sessionInfo = {
secret: "sec",
resave: true,
saveUninitialized: true,
cookie: cookieOptions,
// store: new RedisStore(config.REDIS_OPTS),
};
this.sessionOptions = session(sessionInfo);
this.app.use(bodyParser.urlencoded({extended: true}));
this.app.use(bodyParser.json({limit: "50mb"}));
this.app.use(this.sessionOptions);
/* this.app.use(session(
{
resave: true,
saveUninitialized: true,
secret: config.SECRET,
store: new RedisStore(config.REDIS_OPTS),
},
)); */
this.app.use(passport.initialize());
this.app.use(passport.session());
this.app.use(methodOverride());
// const viewpath = path.join(__dirname, "../views");
// serverService.debug(viewpath);
// this.app.set("views", "./views");
this.app.set('views', path.join(__dirname, 'views'));
this.app.set("view engine", "ejs");

this.app.use((req, res, next): void => {
res.header("Access-Control-Allow-Origin", "*");
res.header("Access-Control-Allow-Headers", "X-Requested-With, Content-Type, Authorization");
res.header("Access-Control-Allow-Methods", "GET,PUT,PATCH,POST,DELETE,OPTIONS");
next();
});
this.app.use(morgan("combined"));
this.app.use(cors());

this.app.use((err: any, req: express.Request, res: express.Response, next: express.NextFunction): void => {
err.status = 404;
next(err);
});
}

private setWebSocket(): void {
this.ws = new WS(this.server, this.sessionOptions);
}
}

ws.ts

1
2
3
4
5
6
7
8
9
10
11
12
13
14
15
16
17
18
19
20
21
22
23
24
25
26
27
28
29
30
31
32
33
34
35
36
37
38
39
40
41
42
43
44
45
46
47
48
49
50
51
52
53
54
55
56
57
58
59
60
61
62
import WebSocket from 'ws';
import express, { Router } from "express";
import http from "http";

.
.
.

export class WS {
private wss: WebSocket.Server;
private server: http.Server;
private session: express.RequestHandler;

constructor(server: http.Server, session: express.RequestHandler) {
this.server = server;
this.session = session;
this.init(server, session);
}

private init(serve: http.Server, session: any) {
this.wss = new WebSocket.Server({

verifyClient:(info: {origin: string; secure: boolean; req: any }, done) => {
console.log('Parsing session from request...');
session(info.req,( )=>{}, ()=>{
if(this.isSessionPassport(info.req)){
done(info.req.session);
}else{
// done(false,401,'unathorized');
done(true);
}
console.log(info.req.session.id);

})
}, server: serve
, path: "/"
});
/* this.pushController = new PushController(this.wss);
this.pushController.startPush(); */
this.connection();
}

private connection(){
this.wss.on("connection",(ws: WebSocket) => {
// this.pushController.broadcastPush("100" , "msg");
ws.on("message", (msg: string) => {
console.log(msg);
})
});
}

private isSessionPassport(req: express.Request){
if(req.session.passport && req.session.passport.user){
console.log(req.session.passport.user);
return true;
}else{
console.log("no passport");
return false;
}
}

}

[TYPESCRIPT] 타입스크립트 디자인 패턴 - Singleton

Singleton Pattern

The singleton pattern is a creational software design pattern.

클래스가 단 하나의 인스턴스 만 갖도록 보장한다.

이점

  1. 하나의 인스턴스만 할당함으로 메모리낭비 방지.
  2. 하나의 프로세스에서 공유자원 접근시 이점
  3. db커넥션풀, 로그 등에 사용됨.

단점

  1. 멀티 프로세스 상황에서 인스턴스공유 이슈 생길수있음
  2. 하나의 인스턴스로 많은 작업을 하게될 경우 문제
1
2
3
4
5
6
7
8
9
10
11
12
13
14
15
16
17
18
19
20
21
22
23
24
25
26
27
class Singleton { 
private static instance: Singleton;
private _temperature: number;
private constructor() { }
static getInstance() {
if (!Singleton.instance) {
Singleton.instance = new Singleton();
Singleton.instance._temperature = 0;
}
return Singleton.instance;
}
get temperature(): number {
return this._temperature;
}
set temperature(score) {
this._temperature = score;
}
increaseTemperature(): number {
return this._temperature += 1;
}
decreaseTemperature(): number {
return this._temperature -= 1;
}
}
const myInstance = Singleton.getInstance();
const myInstance2 = Singleton.getInstance();
console.log(myInstance === myInstance2); // true

[NODEJS] TypeScript with Node.js

[NODEJS] TypeScript with Node.js ?

  1. 프로젝트 폴더 생성

  2. init

    1
    npm init -y
  3. 타입스크립트 설치

    1
    npm install -g typescript
  4. 타입설정 초기화

    1
    tsc — init
  5. tsconfig.json 수정

    1
    2
    3
    4
    5
    6
    7
    8
    9
    10
    11
    12
    13
    14
    {
    "compilerOptions": {
    /* Basic Options */
    "target": "es5", /* Specify ECMAScript target version: 'ES3' (default), 'ES5', 'ES2015', 'ES2016', 'ES2017','ES2018' or 'ESNEXT'. */
    "module": "commonjs", /* Specify module code generation: 'none', 'commonjs', 'amd', 'system', 'umd', 'es2015', or 'ESNext'. */
    "outDir": "./dist", /* Redirect output structure to the directory. */
    "strict": true, /* Enable all strict type-checking options. */
    "esModuleInterop": true /* Enables emit interoperability between CommonJS and ES Modules via creation of namespace objects for all imports. Implies 'allowSyntheticDefaultImports'. */

    },
    "include": [
    "./src/**/*"
    ]
    }

  1. 폴더생성 ./src ./dist

  2. .src/test.ts 작성

    1
    2
    3
    4
    5
    6
    7
    8
    9
    10
    11
    class Person {
    private hello: String = "";
    constructor(private name: String) {
    this.hello = name + " Hello~";
    }
    public getHello(): String{
    return this.hello;
    }
    }
    let person: Person = new Person("namgi");
    console.log(person.getHello());
  3. tsc 컴파일

    1
    tsc
  4. js 파일 실행

    1
    node ./dist/test.js
  5. 결과물 확인
    결과

[NODEJS] 타입스크립트(typescript) ?

[NODEJS] 타입스크립트(typescript) ?

TypeScript는 마이크로소프트에서 2012년 발표한 오픈소스라고 한다.

정적 타이핑을 지원하며 ES6(ECMAScript 2015)의 클래스, 모듈 등과 ES7의 Decorator 등을 지원한다.

ES6의 새로운 기능들을 사용하기 위해 Babel과 같은 별도 트랜스파일러(Transpiler)를 사용하지 않아도 ES6의 새로운 기능을 기존의 자바스크립트 엔진(현재의 브라우저 또는 Node.js)에서 실행할 수 있다.

특징?

이름에서 알수 있듯이 모든 변수나 반환값에 타입을 지정해야한다. 미리 에러를 알 수 있겠다.

“TypeScript는 정적 타입을 지원하므로 컴파일 단계에서 오류를 포착할 수 있는 장점이 있다. 명시적인 정적 타입 지정은 개발자의 의도를 명확하게 코드로 기술할 수 있다. 이는 코드의 가독성을 높이고 예측할 수 있게 하며 디버깅을 쉽게 한다.” 라고한다.

인터페이스나 제네릭과 같은 객체지향 프로그래밍을 지원한다. 자바나 C#개발자들이 자바스크립트 프로젝트를 개발하는데 도움을 줄수있겠다.

사용법?

npm install -g typescript 설치 후

.ts로 작성후 tsc 명령어로 컴파일하면 .js 파일로 떨궈준다.

[ANSIBLE] - PLAYBOOK WITH WEBSERVER


playbook 구조

작동 싸이클


webserver.yml

1
2
3
4
5
6
7
8
9
10
11
12
13

---
- hosts: webservers
remote_user: root
become: no
vars:
git_user : nkyoon@xxx.com
git_password :
webapp_name: webserver
webapp_path: /home/WebServer
roles:
- yum_packages
- app.source

yum_packages/tasks/main.yml

1
2
3
4
5
6
7
8
9
10
11
12
13
14
- name: nodejs repo
shell: "curl --silent --location https://rpm.nodesource.com/setup_10.x | sudo bash -"

- name: "Installing PKG"
yum:
state: present
name:
- git
- gcc-c++
- make
- nodejs

- name: install pm2
npm: name=pm2 global=true production=true

app.source/tasks/main.yml

1
2
3
4
5
6
7
8
9
10
11
12
13
14
15
16
17
18
19
20
21
22
23
24
25
26
27
28
29
30
31
32
33
34
- name: pull from git
git:
repo: https://{{ git_user | urlencode }}:{{ git_password | urlencode }}@git.xxxxx.com/xxx/WebServer.git
dest: "{{ webapp_path }}"
update: yes
force: yes
version: develop

## npm 의존성 모듈을 설치
- name: install dependencies
shell: "cd {{ webapp_path }} && npm install "

## npm build -> dist
- name: npm build
shell: "cd {{ webapp_path }} && npm run-script build"

## 앱의 설치 상태를 확인
- name: check for webapp
shell: "pm2 show {{ webapp_name }}"
register: webapp_result
ignore_errors: true
become: true

## 기존의 앱을 종료
- name: stop webapp
shell: "pm2 stop {{ webapp_name }}"
when: "webapp_status.rc == 0"
ignore_errors: true
become: true

## 앱 실행
- name: start webapp
shell: "cd {{ webapp_path }} && pm2 start pm2-config.json"
become: true

배포 테스트

1
2
3
4
5
6
7
8
9
10
11
12
13
14
15
16
17
18
19
20
21
22
23
24
25
26
27
28
29
30
31
32
33
34
35
36
37
38
[root@tcid ansible]# ansible-playbook webserver.yml
PLAY [webservers] ******************************************************************************************************************************************************************************************

TASK [Gathering Facts] *************************************************************************************************************************************************************************************
ok: [xxx.xxx.xxx.xxx]

TASK [yum_packages : nodejs repo] **************************************************************************************************************************************************************************
[WARNING]: Consider using the get_url or uri module rather than running 'curl'. If you need to use command because get_url or uri is insufficient you can add 'warn: false' to this command task or set
'command_warnings=False' in ansible.cfg to get rid of this message.

changed: [xxx.xxx.xxx.xxx]

TASK [yum_packages : Installing PKG] ***********************************************************************************************************************************************************************
ok: [xxx.xxx.xxx.xxx]

TASK [yum_packages : install pm2] **************************************************************************************************************************************************************************
ok: [xxx.xxx.xxx.xxx]

TASK [app.source : pull from git] **************************************************************************************************************************************************************************
changed: [xxx.xxx.xxx.xxx]

TASK [app.source : install dependencies] *******************************************************************************************************************************************************************
changed: [xxx.xxx.xxx.xxx]

TASK [app.source : npm build] ******************************************************************************************************************************************************************************

TASK [app.source : check for webapp] ***********************************************************************************************************************************************************************
changed: [xxx.xxx.xxx.xxx]

TASK [app.source : stop webapp] ****************************************************************************************************************************************************************************
fatal: [xxx.xxx.xxx.xxx]: FAILED! => {"msg": "The conditional check 'webapp_status.rc == 0' failed. The error was: error while evaluating conditional (webapp_status.rc == 0): 'webapp_status' is undefined\n\nThe error appears to have been in '/etc/ansible/roles/app.source/tasks/main.yml': line 25, column 3, but may\nbe elsewhere in the file depending on the exact syntax problem.\n\nThe offending line appears to be:\n\n## 기존의 앱을 종료\n- name: stop webapp\n ^ here\n"}
...ignoring

TASK [app.source : start webapp] ***************************************************************************************************************************************************************************
changed: [xxx.xxx.xxx.xxx]

PLAY RECAP *************************************************************************************************************************************************************************************************
xxx.xxx.xxx.xxx : ok=10 changed=6 unreachable=0 failed=0

[ANSIBLE] - PLAYBOOK 작성

playbook :
설정파일(YAML)에 미리 정의하여 원격 노드서버의 구성 및 배포를 관리 할수있다.


example

1
2
3
4
5
6
7
8
9
10
11
12
13
14
15
16
17
18
19
20
21
22
23
24
25
26
---
- hosts: webservers # /etc/ansible/hosts에 정의된 [webservers] 그룹
vars:
http_port: 80
max_clients: 200
remote_user: root # 작업유저
tasks: # 작업리스트
- name: ensure apache is at the latest version
yum: # 패키지 설치
name: httpd
state: latest
- name: write the apache config file
template: # 파일 복사
src: /srv/httpd.j2
dest: /etc/httpd.conf
notify: # handlers 노티
- restart apache
- name: ensure apache is running
service: #서비스 실행
name: httpd
state: started
handlers: # 노티를 listen
- name: restart apache
service:
name: httpd
state: restarted

작성된 playbook 실행

1
ansible-playbook playbook.yml -f 10 # 병렬처리 레벨 10

팁 명령어 옵션 –syntax-check flag
에러 체크해쥼

ansible-playbook playbook.yml –list-hosts # host 목록확인

참고: https://docs.ansible.com/ansible/latest/user_guide/playbooks.html
playbook 문법: https://taesany.tistory.com/139

[JENKINS] - ANSIBLE 연동


1. 플러그인 설치 ansible plugin


2. Global Tool Config

Alt text


3. Credential 추가 - system - global credentials

Alt text


4. 빌드 추가 invoke ansible ad-hoc command

Alt text


5. credential 등록을 했음에도 에러가 난다…

Alt text


6. jenkins 권한으로도 ssh key를 등록해야한다.

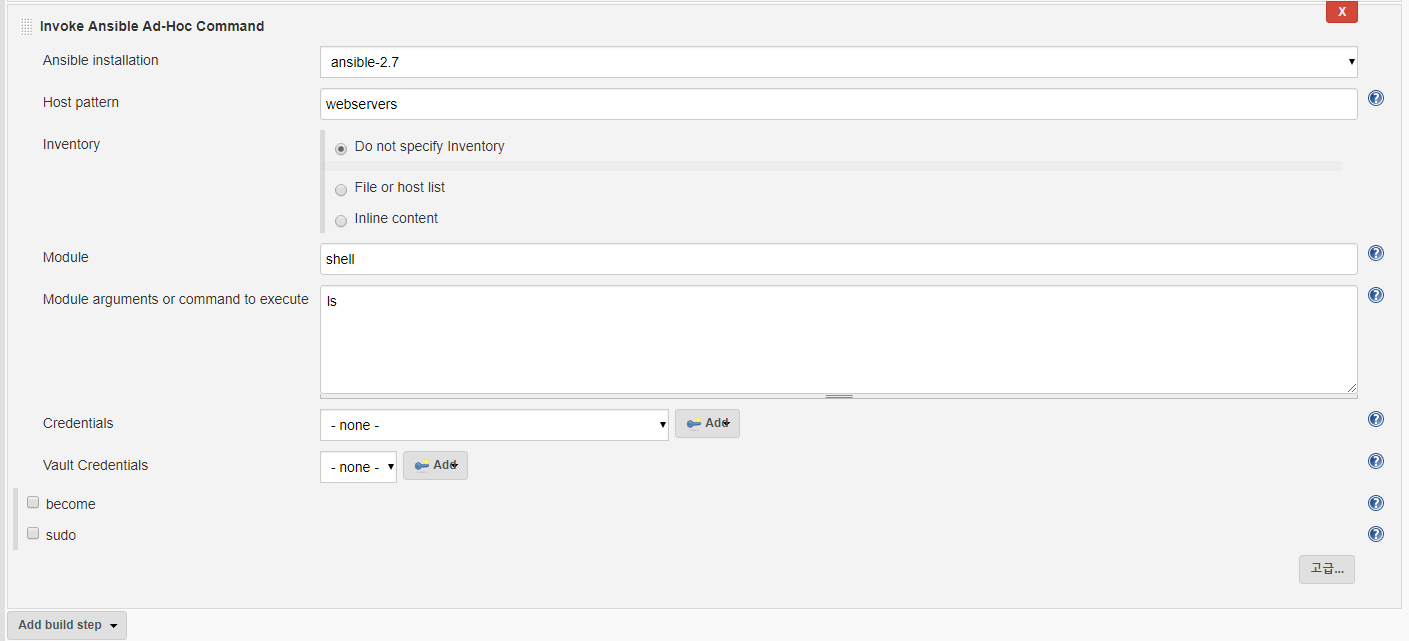
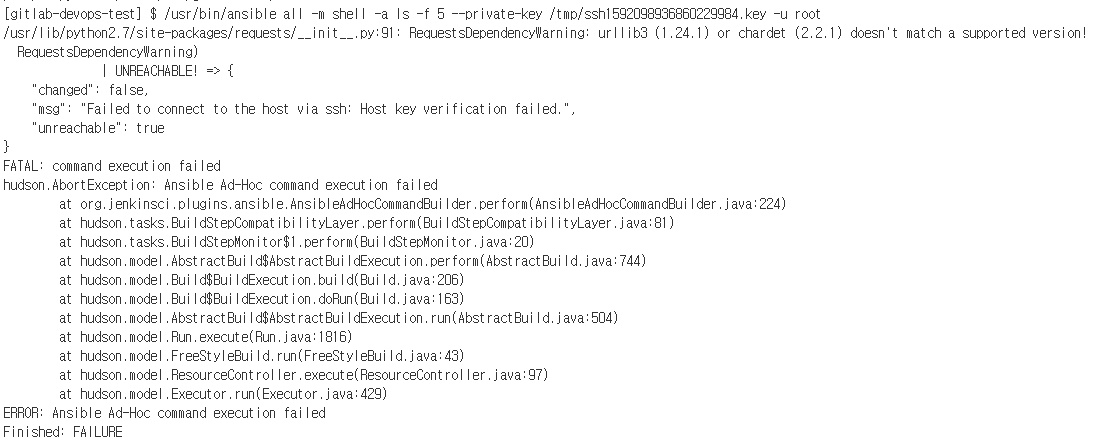
root에서는 ansible all -a “ls” 명령이 잘된다.

jenkins로 변경 후 테스트

1
2
3
4
5
6
su -s /bin/bash jenkins
xxx.xxx.xxx.xxx | UNREACHABLE! => {
"changed": false,
"msg": "Failed to connect to the host via ssh: Warning: Permanently added 'xxx.xxx.xxx.xxx' (ECDSA) to the list of known hosts.\r\nPermission denied (publickey,gssapi-keyex,gssapi-with-mic,password).",
"unreachable": true
}

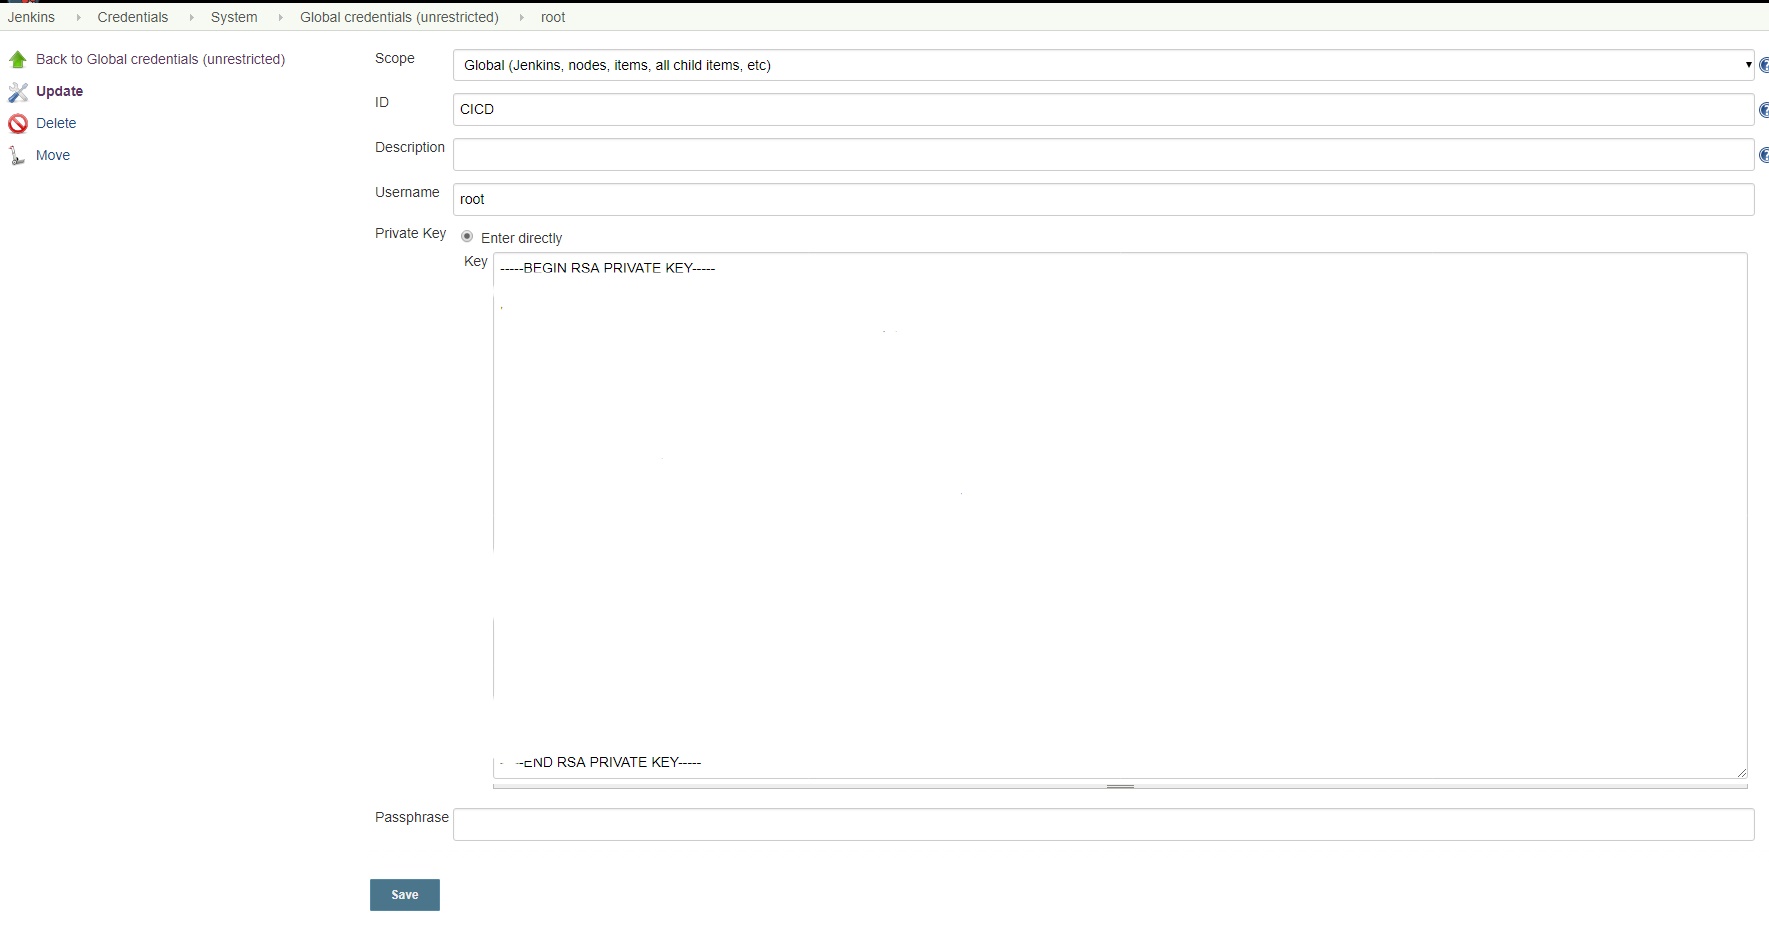
ssh 위치는 /var/lib/jenkins/.ssh

root .ssh/ 파일들을 복사해준다.

1
2
3
4
5
6
7
8
9
10
11
12
13
ansible all -a "ls" 

xxx.xxx.xxx.xxx | CHANGED | rc=0 >>
1
cx
node-v10.13.0
node-v10.13.0-linux-x64
node-v10.13.0-linux-x64.tar
node-v10.13.0.tar.gz
remi-release-7.5-2.el7.remi.noarch.rpm
zabbix-agent-3.4.11-1.el7.x86_64.rpm
zabbix-tcp-master
Finished: SUCCESS

7. 최종 빌드 테스트

Alt text

[ANSIBLE] Ad-Hoc

커맨드 명령으로 원격지 /etc/ansible/hosts 에 정의된 서버노드들에 대해 명령을 보낸다.


EXAMPLE

1
ansible webservers -a "ls -al"

파일전송

1
$ ansible webservers -m file -a "dest=/path/to/c mode=755 owner=mdehaan group=mdehaan state=directory"

yum 설치

1
$ ansible webservers -m yum -a "name=acme state=absent"

GIT 명령

1
$ ansible webservers -m git -a "repo=https://foo.example.org/repo.git dest=/srv/myapp version=HEAD"

서비스 관리

1
$ ansible webservers -m service -a "name=httpd state=restarted"

[ANSIBLE] NODE 등록

Ansible은 모든 target node 작업을 ssh 기반으로 접근하여 처리한다.

타 시스템으로 접근하여 작업을 하기 위해 ID/PASS 없이 암호화된 키를 전달하여 상호 인증하는 환경을 구성해야 한다.


1. Ansible Hosts 파일에 노드 등록

1
2
3
4
vi /etc/ansible/hosts

[webservers]
xxx.xxx.xxx.xxx

2. SSH Key 생성

1
2
3
ssh-keygen -t rsa -C "nkyoon@xxx.com"
cd ./.ssh/
cp id_rsa.pub authorized_keys

3. SSH Key NODE로 복사

1
2
3
4
ssh root@web01 "mkdir ./.ssh;chmod 700 ./.ssh"
scp authorized_keys root@01:~/.ssh/authorized_keys

ansible webservers -m ping #테스트

[JENKINS] GitLab 연동 및 빌드 테스트


1. 소스 코드 관리

Alt text


2. URL 연결시 ssl 이슈

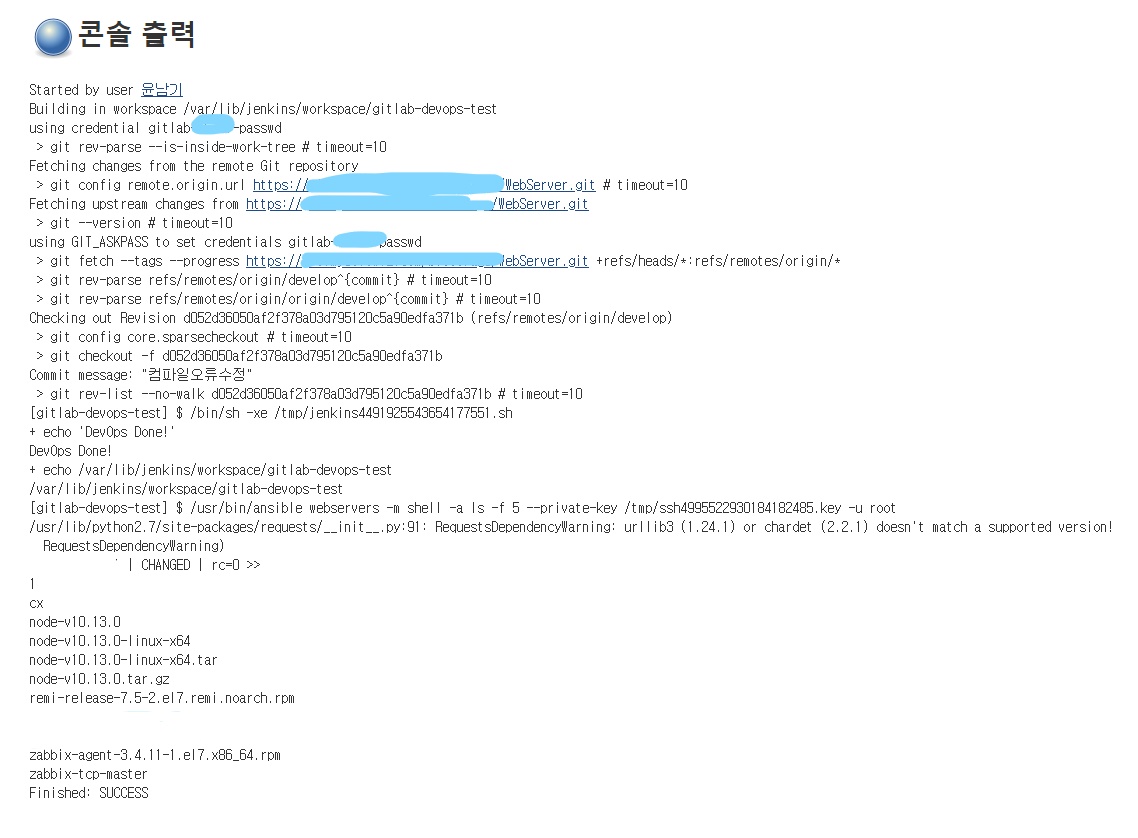
jenkins 관리 - 시스템설정 - 환경변수 추가

GIT_SSL_NO_VERIFY , true


3. 빌드유발 - 웹훅 주소 획득

Alt text


4. gitlab - 프로젝트 - 설정- integrations

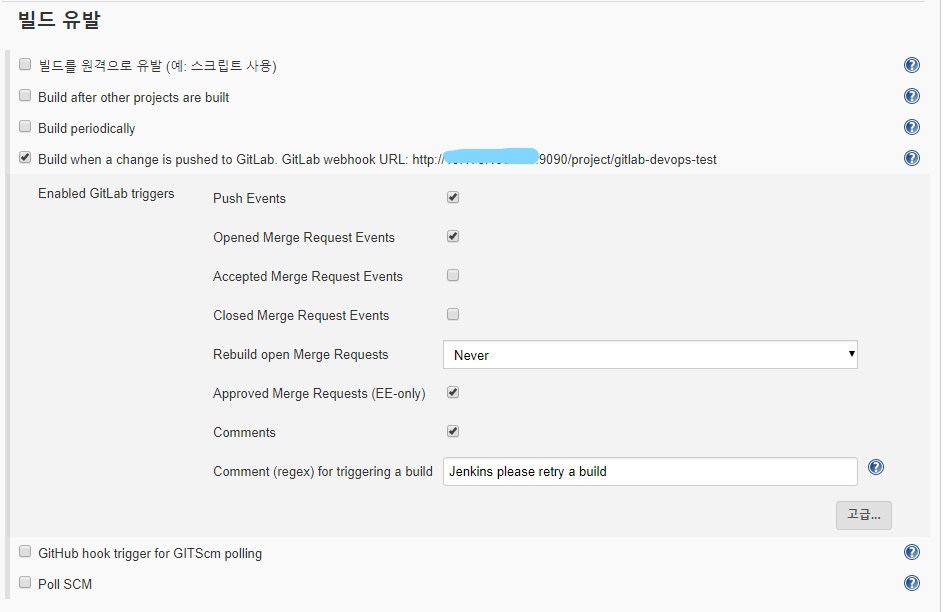
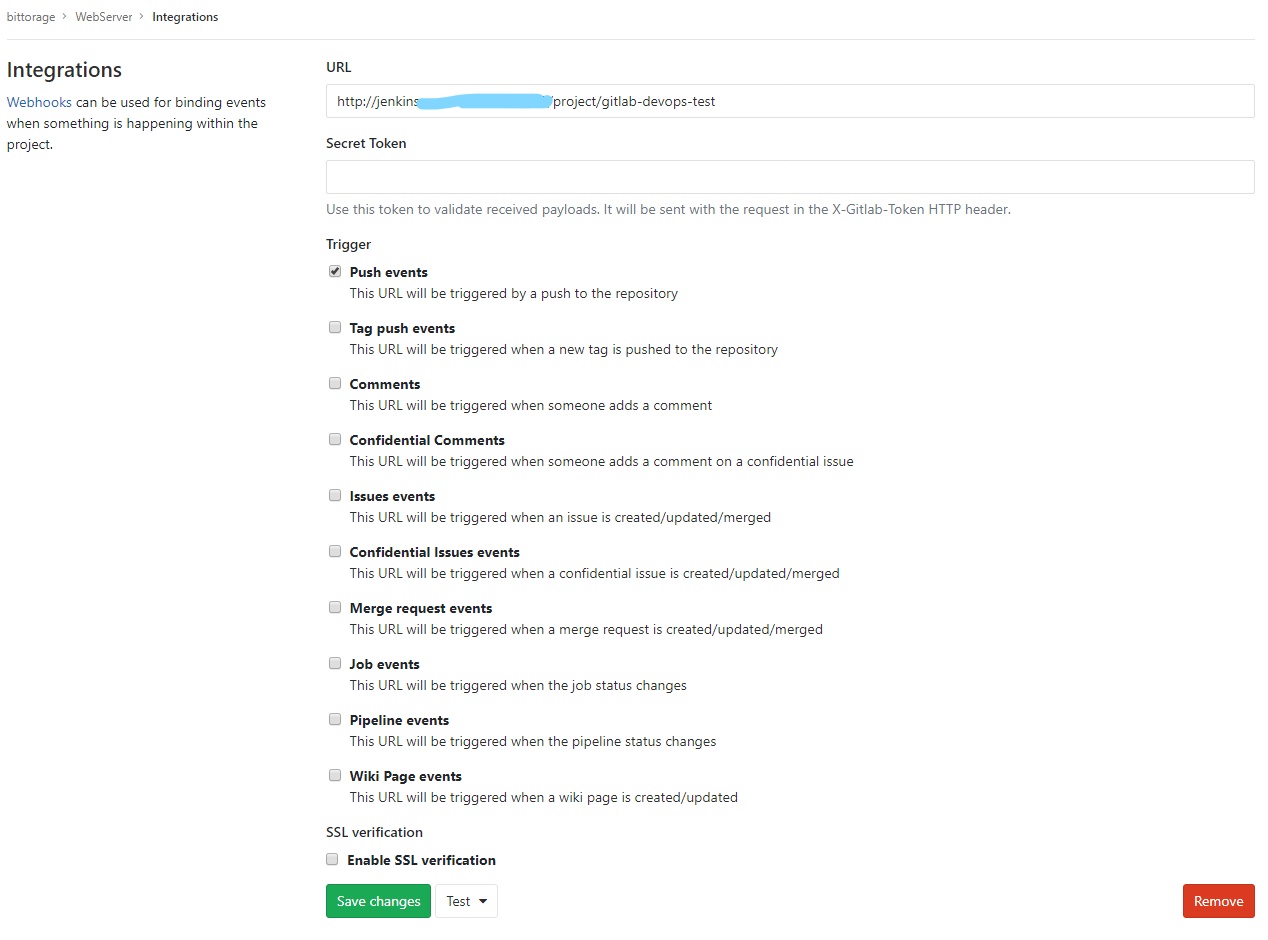
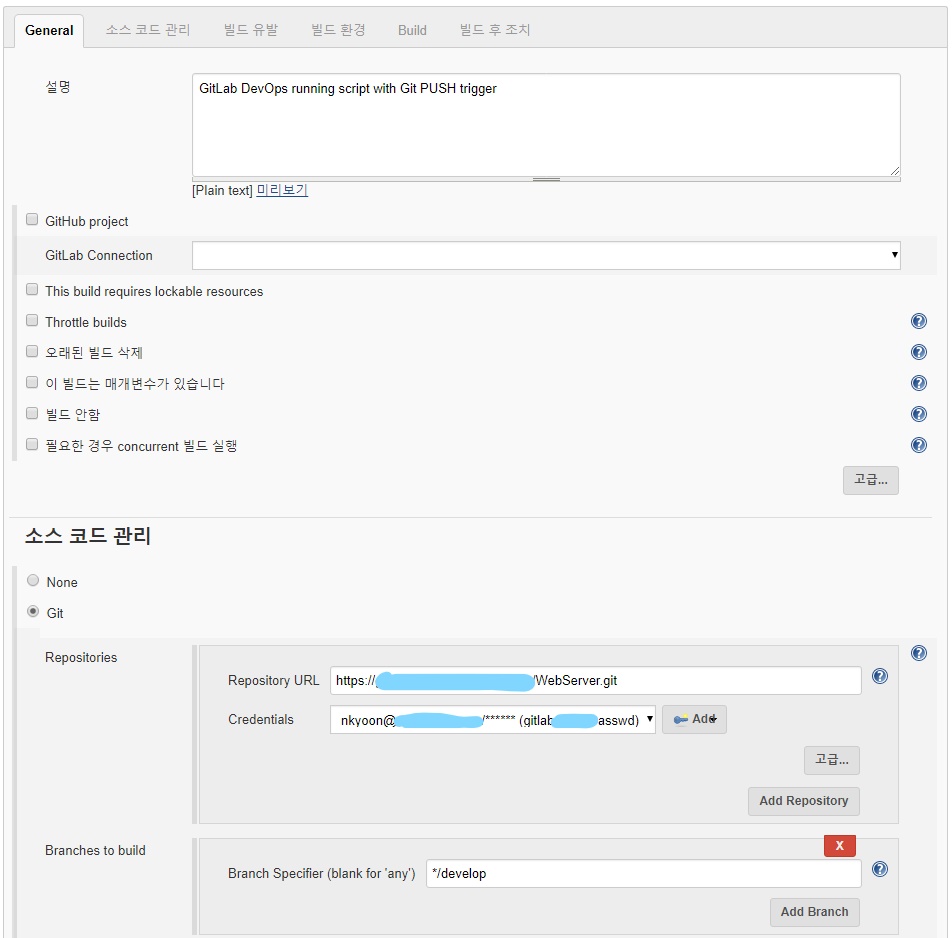
웹훅 url 입력 http://jenkins.xxx.com:9090/project/gitlab-devops-test
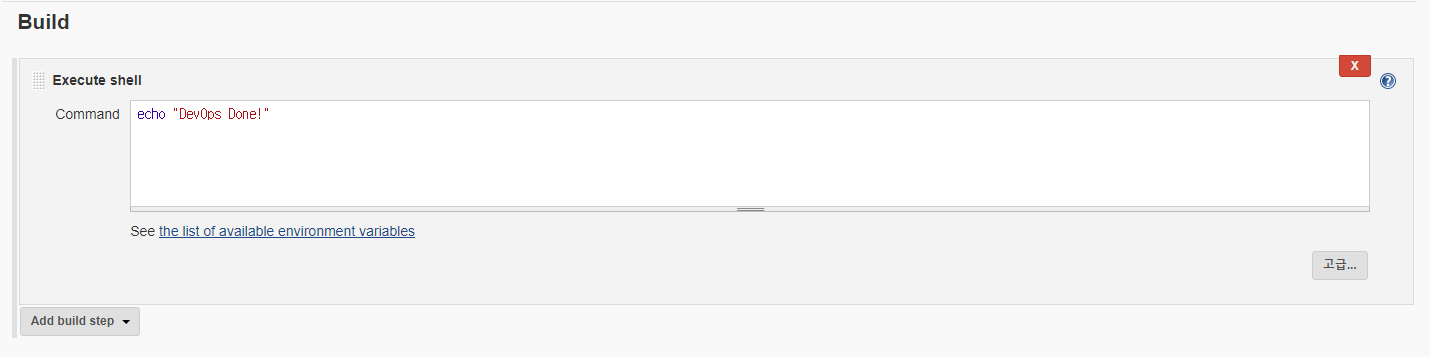
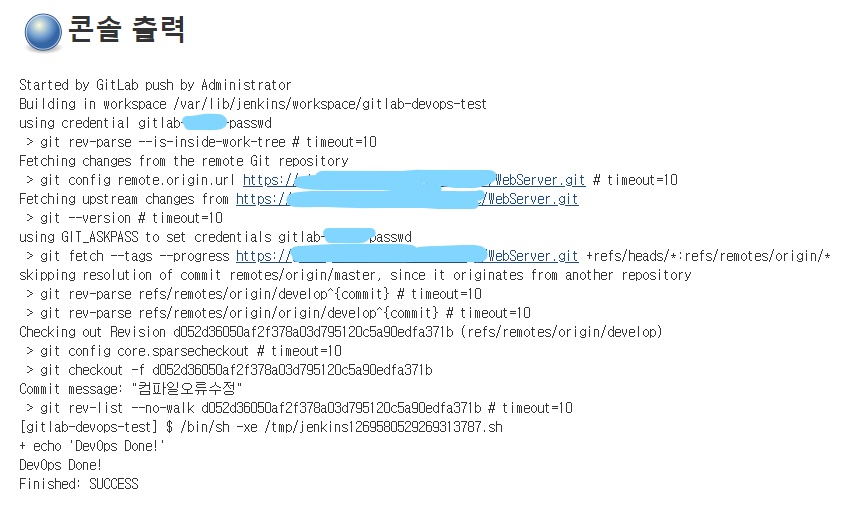
푸쉬 이벤트시 빌드 유발

Alt text


5. 웹훅 처리를 위한 아웃바운드 허용 - ADMIN- 설정

Alt text


6. 빌드 시 작업 테스트

Alt text


7. 푸쉬 이벤트 발생시 젠킨스 빌드

Alt text

참고: http://egloos.zum.com/mcchae/v/11246199