Unity PC 클라이언트에서 SNS 로그인을 구현할 때 가장 일반적인 방식 중 하나는 OAuth2.0을 사용하는 것입니다. 특히, 서버가 이미 OAuth2 기반 로그인 시스템을 가지고 있다면, 클라이언트는 복잡한 인증 로직을 직접 구현할 필요 없이 서버와 안전하게 통신하는 방식으로 구성할 수 있습니다.
[텔레그램 봇] Go Telegram Bot With Golang
시작하기
- API 받기 및 bot생성
/help 명령어를 통해 가능한 기능들 확인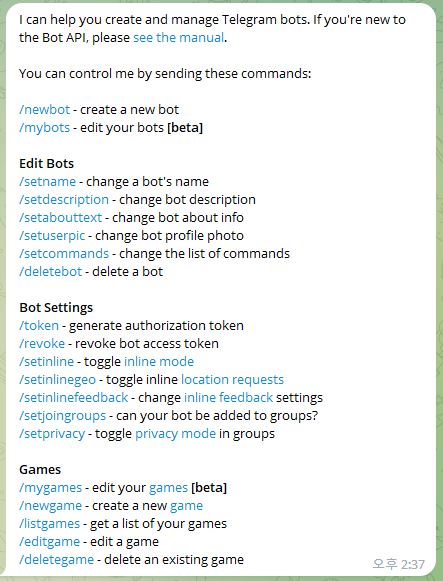
/newbot 으로 생성해서 순서대로 시키는대로 하면 토큰이 나온다.
- Library Example 따라하기
https://github.com/mymmrac/telego
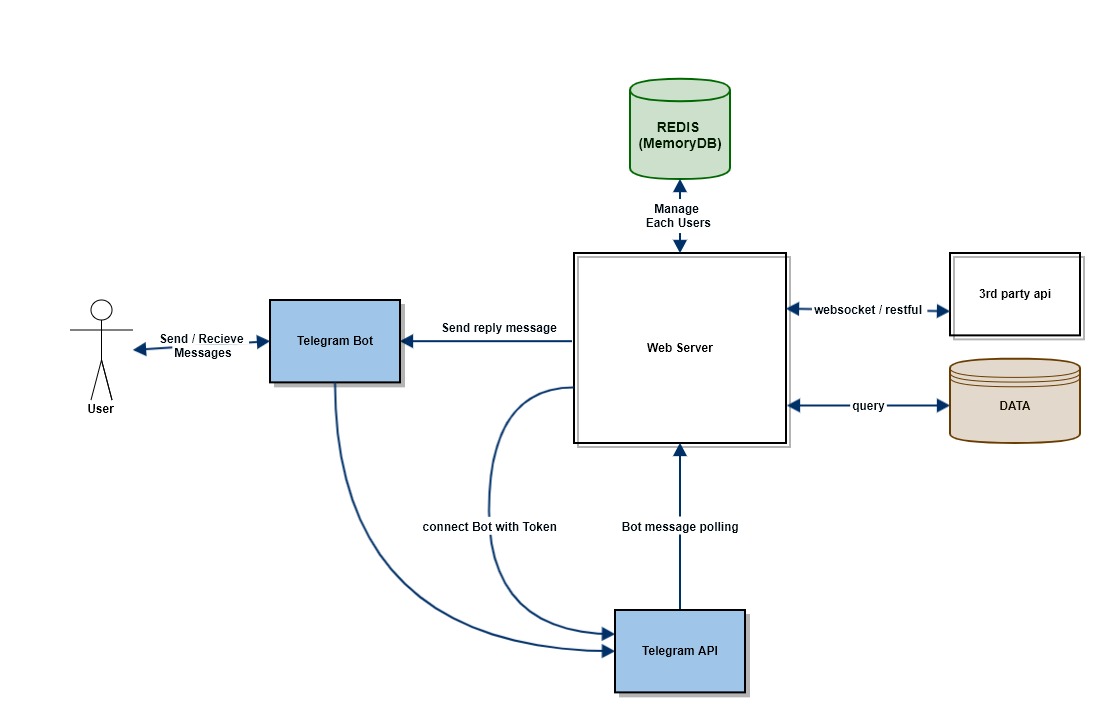
데이터 수신방법 2가지
using long polling (bot.UpdatesViaLongPolling)
using webhook (bot.UpdatesViaWebhook)
유틸을 사용해서 메시지말고 다양한 형태로 보낼수있다.
Message(chatID, text) => SendMessageParams
Photo(chatID, photoFile) => SendPhotoParams
Location(chatID, latitude, longitude) => SendLocationParams
…
Or other useful methods like:
ID(intID) => ChatID
File(namedReader) => InputFile
…
채팅방 Input 기능
/명령어 , 키보드버튼, 인라인버튼
예제에는 Bot과의 Interaction 기능 ,외부 서버와 Integration 기능은 없다.
- 실전소스 with Golang
1 | import ( |
1 | botToken := "6048725563:xxxx" // set token |
1 | //인라인 키보드 생성 EXAM |
1 | // Register new handler with match on command `/start` |
1 | //inline button click 시 callback 처리 |
1 | // inline button에 웹앱 링크걸기 |
[TYPESCRIPT] 타입스크립트 디자인 패턴 - Factory
Factory Pattern
The factory pattern is one of the creational software design patterns.
Creational: 오브젝트의 생성을 다루는
이점
- 객체 생성 프로세스가 복잡한 상황이나 동일한 속성을 공유하는 여러 객체가 생성되는 상황에서 사용될 수 있습니다.
예제1
2
3
4
5
6
7
8
9
10
11
12
13
14
15
16
17
18// mavelfactory.ts
export class MavelFactory {
private name: string;
private power: number;
constructor(name: string, power: number) {
this.name = name;
this.power = power;
}
introduce() {
console.log(`Hello, I am ${this.name}.`);
}
}
export function createHero(name: string, power: number) {
return new HeroFactory(name, power);
}
실행1
2
3
4
5
6
7
8// app.ts
import * as mavelfactory from './mavelfactory';
const spiderman = heroFactory.createHero('Peter', 100);
spiderman.introduce();
const ironman = heroFactory.createHero('Stark', 100);
ironman.introduce();
[TYPESCRIPT] 타입스크립트 디자인 패턴 - Facade
Facade Pattern
The façade pattern is one of the structural software design patterns.
Structural: 객체간의 관계를 처리
이점
- 여러시스템을 통합하는 인터페이스가 필요한 경우 사용.
서브시스템11
2
3
4
5
6
7
8
9
10
11
12
13
14
15// subsystem1.ts
export class Contract {
private contractTerminationDateexport class Contract {
private contractTerminationDate: Date;
constructor(terminationDate: Date) {
this.contractTerminationDate = terminationDate;
}
checkActiveContract(date: Date): boolean {
if (date < this.contractTerminationDate) {
return true;
} else {
return false;
}
}
}
서브시스템21
2
3
4
5
6
7
8
9
10
11
12
13
14// subsystem2.ts
export class TeamFunds {
private totalFunds: number;
constructor(total: number) {
this.totalFunds = total;
}
checkFunds(transferFee: number): boolean {
if (transferFee < this.totalFunds) {
return true;
} else {
return false;
}
}
}
Facade 패턴으로 2개의 서브 시스템을 통합하여 기능제공1
2
3
4
5
6
7
8
9
10
11
12
13
14
15
16
17
18
19
20
21
22
23
24
25
26
27
28
29// facade.ts
import { Contract } from './subsystem1';
import { TeamFunds } from './subsystem2';
export class Facade {
private contract: Contract = new Contract(new Date(new Date().setDate(new Date().getDate() + 10)));
private funds: TeamFunds = new TeamFunds(200000);
private playerContract: Date;
private playerPrice: number;
constructor(playerPrice: number) {
this.playerContract = new Date();
this.playerPrice = playerPrice;
}
buyPlayer(): void {
if (this.contract.checkActiveContract(this.playerContract)) {
console.log('Player has active contract');
} else {
console.log('Player has no active contract');
if (!this.funds.checkFunds(this.playerPrice)) {
console.log('Player is too expensive to buy.');
} else {
console.log('Player can be bought.');
}
}
}
}
사용시1
2
3
4
5// app.ts
import { Facade } from './facade';
const facade: Facade = new Facade(200001);
facade.buyPlayer();
[TYPESCRIPT] 타입스크립트 디자인 패턴 - Adapter
Adapter Pattern
The adapter pattern is one of the structural software design patterns.
Structural: 객체간의 관계를 처리
이점
- 클라이언트 인터페이스를 변경하지 않고 새로운 시스템의 기능을 제공하게 한다.
1 | // adapter.ts |
1 | // client.ts |
[AWS] 서버리스 프레임워크 간단한 예제(Serverless Framework Simple Example)
Serverless 프레임워크는 서버리스 애플리케이션을 생성하고 배포하기 위해 필요한 모든 도구들을 쉽게 관리할 수 있는 패키지 형태로 묶어서 제공한다.
serverless cli 를 이용한 간단한 serverless 테스트
node 와 npm 설치 생략…
1. serverless cli 설치1
npm install -g serverless
2. 서비스/프로젝트 생성1
2
3
4
5
6
7
8
9
10
11
12
13
14
15
16
17
18
19
20serverless
Serverless: No project detected. Do you want to create a new one? Yes
Serverless: What do you want to make? AWS Node.js
Serverless: What do you want to call this project? sample
Project successfully created in 'sample' folder.
(node:30044) Warning: a promise was created in a handler at domain.js:121:23 but was not returned from it, see http://goo at Object.ret [as lstatAsync] (eval at makeNodePromisifiedEval (C:\Users\DEV\AppData\Roaming\npm\node_modules\serverless\node_modules\bluebird\js\release\promisify.js:184:12), <anonymous>:8:21)
You can monitor, troubleshoot, and test your new service with a free Serverless account.
Serverless: Would you like to enable this? Yes
Serverless: What application do you want to add this to? (Use arrow keys)
Serverless: What application do you want to add this to? myapp
Your project is setup for monitoring, troubleshooting and testing
Deploy your project and monitor, troubleshoot and test it:
- Run "serverless deploy" to deploy your service.
- Run "serverless dashboard" to view the dashboard.
3. 샘플소스
handler.js1
2
3
4
5
6
7
8
9
10
11
12
13
14
15
16
17
18
19
'use strict';

module.exports.hello = async event => {
  return {
    statusCode: 200,
    body: JSON.stringify(
      {
        message: 'Go Serverless v1.0! Your function executed successfully!',
        input: event,
      },
      null,
      2
    ),
  };

  // Use this code if you don't use the http event with the LAMBDA-PROXY integration
  // return { message: 'Go Serverless v1.0! Your function executed successfully!', event };
};
serverless.yml1
2
3
4
5
6
7
8
9
10
11
12
13
14
15
16
17service: sample
app: myapp
org: skarlsla
provider:
name: aws
runtime: nodejs12.x
functions:
hello:
handler: handler.hello
## endpoint 추가
events:
- http:
path: hello
method: post
4. 배포(serverless deploy)1
2
3
4
5
6
7
8
9
10
11
12
13
14
15
16
17
18
19
20
21
22
23
24
25
26
27
28
29
30
31
32
33
34
35
36
37
38
39
40
41
42
43
44
45
46
47
48
49
50
51
52
53
54
55
56
57
58
59
60
61
62
63
64
65
66
67
68
69
70
71
72
73
74
75
76
77
78
79
80
81
82
83
84
85
86
87
88
89
90
91
92
93serverless deploy -v
Serverless: Packaging service...
Serverless: Excluding development dependencies...
Serverless: Installing dependencies for custom CloudFormation resources...
Serverless: Safeguards Processing...
Serverless: Safeguards Results:
Summary --------------------------------------------------
warned - require-cfn-role
passed - allowed-runtimes
passed - framework-version
passed - allowed-stages
passed - allowed-regions
passed - no-unsafe-wildcard-iam-permissions
passed - no-secret-env-vars
Details --------------------------------------------------
1) Warned - no cfnRole set
details: http://slss.io/sg-require-cfn-role
Require the cfnRole option, which specifies a particular role for CloudFormation to assume while deploying.
Serverless: Safeguards Summary: 6 passed, 1 warnings, 0 errors
Serverless: Uploading CloudFormation file to S3...
Serverless: Uploading artifacts...
Serverless: Uploading service sample.zip file to S3 (68.29 KB)...
Serverless: Uploading custom CloudFormation resources...
Serverless: Validating template...
Serverless: Updating Stack...
Serverless: Checking Stack update progress...
CloudFormation - UPDATE_IN_PROGRESS - AWS::CloudFormation::Stack - sample-dev
CloudFormation - CREATE_IN_PROGRESS - AWS::ApiGateway::RestApi - ApiGatewayRestApi
CloudFormation - CREATE_IN_PROGRESS - AWS::Logs::LogGroup - ApiGatewayLogGroup
CloudFormation - CREATE_IN_PROGRESS - AWS::IAM::Role - IamRoleCustomResourcesLambdaExecution
CloudFormation - UPDATE_IN_PROGRESS - AWS::Lambda::Function - HelloLambdaFunction
CloudFormation - CREATE_IN_PROGRESS - AWS::IAM::Role - IamRoleCustomResourcesLambdaExecution
CloudFormation - CREATE_IN_PROGRESS - AWS::ApiGateway::RestApi - ApiGatewayRestApi
CloudFormation - CREATE_IN_PROGRESS - AWS::Logs::LogGroup - ApiGatewayLogGroup
CloudFormation - CREATE_COMPLETE - AWS::ApiGateway::RestApi - ApiGatewayRestApi
CloudFormation - CREATE_COMPLETE - AWS::Logs::LogGroup - ApiGatewayLogGroup
CloudFormation - UPDATE_COMPLETE - AWS::Lambda::Function - HelloLambdaFunction
CloudFormation - CREATE_IN_PROGRESS - AWS::ApiGateway::Resource - ApiGatewayResourceHello
CloudFormation - CREATE_IN_PROGRESS - AWS::Lambda::Version - HelloLambdaVersiong6DbuZk46pqXfxgUZxqbVYYaGuA5hOV9bb2oYYmZCQCloudFormation - CREATE_IN_PROGRESS - AWS::Logs::SubscriptionFilter - CloudWatchLogsSubscriptionFilterApiGatewayLogGroup
CloudFormation - CREATE_IN_PROGRESS - AWS::Lambda::Permission - HelloLambdaPermissionApiGateway
CloudFormation - CREATE_IN_PROGRESS - AWS::Logs::SubscriptionFilter - CloudWatchLogsSubscriptionFilterApiGatewayLogGroup
CloudFormation - CREATE_IN_PROGRESS - AWS::Lambda::Permission - HelloLambdaPermissionApiGateway
CloudFormation - CREATE_IN_PROGRESS - AWS::ApiGateway::Resource - ApiGatewayResourceHello
CloudFormation - CREATE_IN_PROGRESS - AWS::Lambda::Version - HelloLambdaVersiong6DbuZk46pqXfxgUZxqbVYYaGuA5hOV9bb2oYYmZCQCloudFormation - CREATE_COMPLETE - AWS::Logs::SubscriptionFilter - CloudWatchLogsSubscriptionFilterApiGatewayLogGroup
CloudFormation - CREATE_COMPLETE - AWS::ApiGateway::Resource - ApiGatewayResourceHello
CloudFormation - CREATE_COMPLETE - AWS::Lambda::Version - HelloLambdaVersiong6DbuZk46pqXfxgUZxqbVYYaGuA5hOV9bb2oYYmZCQ
CloudFormation - CREATE_IN_PROGRESS - AWS::ApiGateway::Method - ApiGatewayMethodHelloPost
CloudFormation - CREATE_IN_PROGRESS - AWS::ApiGateway::Method - ApiGatewayMethodHelloPost
CloudFormation - CREATE_COMPLETE - AWS::ApiGateway::Method - ApiGatewayMethodHelloPost
CloudFormation - CREATE_IN_PROGRESS - AWS::ApiGateway::Deployment - ApiGatewayDeployment1577175940021
CloudFormation - CREATE_IN_PROGRESS - AWS::ApiGateway::Deployment - ApiGatewayDeployment1577175940021
CloudFormation - CREATE_COMPLETE - AWS::ApiGateway::Deployment - ApiGatewayDeployment1577175940021
CloudFormation - CREATE_COMPLETE - AWS::Lambda::Permission - HelloLambdaPermissionApiGateway
CloudFormation - CREATE_COMPLETE - AWS::IAM::Role - IamRoleCustomResourcesLambdaExecution
CloudFormation - CREATE_IN_PROGRESS - AWS::Lambda::Function - CustomDashresourceDashapigwDashcwDashroleLambdaFunction
CloudFormation - CREATE_IN_PROGRESS - AWS::Lambda::Function - CustomDashresourceDashapigwDashcwDashroleLambdaFunction
CloudFormation - CREATE_COMPLETE - AWS::Lambda::Function - CustomDashresourceDashapigwDashcwDashroleLambdaFunction
CloudFormation - CREATE_IN_PROGRESS - Custom::ApiGatewayAccountRole - CustomApiGatewayAccountCloudWatchRole
CloudFormation - CREATE_IN_PROGRESS - Custom::ApiGatewayAccountRole - CustomApiGatewayAccountCloudWatchRole
CloudFormation - CREATE_COMPLETE - Custom::ApiGatewayAccountRole - CustomApiGatewayAccountCloudWatchRole
CloudFormation - UPDATE_COMPLETE_CLEANUP_IN_PROGRESS - AWS::CloudFormation::Stack - sample-dev
CloudFormation - DELETE_SKIPPED - AWS::Lambda::Version - HelloLambdaVersionkQRfnNyzdsFOd9cvxTBAHNZoGDtQ2l6Z2hDwU58
CloudFormation - UPDATE_COMPLETE - AWS::CloudFormation::Stack - sample-dev
Serverless: Stack update finished...
Service Information
service: sample
stage: dev
region: us-east-1
stack: sample-dev
resources: 18
api keys:
None
endpoints:
POST - https://bmusgn5jfh.execute-api.us-east-1.amazonaws.com/dev/hello
functions:
hello: sample-dev-hello
layers:
None
Stack Outputs
EnterpriseLogAccessIamRole: arn:aws:iam::271382553193:role/sample-dev-EnterpriseLogAccessIamRole-ZZR7ZNGND4U4
HelloLambdaFunctionQualifiedArn: arn:aws:lambda:us-east-1:271382553193:function:sample-dev-hello:2
ServiceEndpoint: https://bmusgn5jfh.execute-api.us-east-1.amazonaws.com/dev
ServerlessDeploymentBucketName: sample-dev-serverlessdeploymentbucket-1r9jccbx0b91l
Serverless: Publishing service to the Serverless Dashboard...
Serverless: Successfully published your service to the Serverless Dashboard: https://dashboard.serverless.com/tenants/skarlsla/applications/myapp/services/sample/stage/dev/region/us-east-1
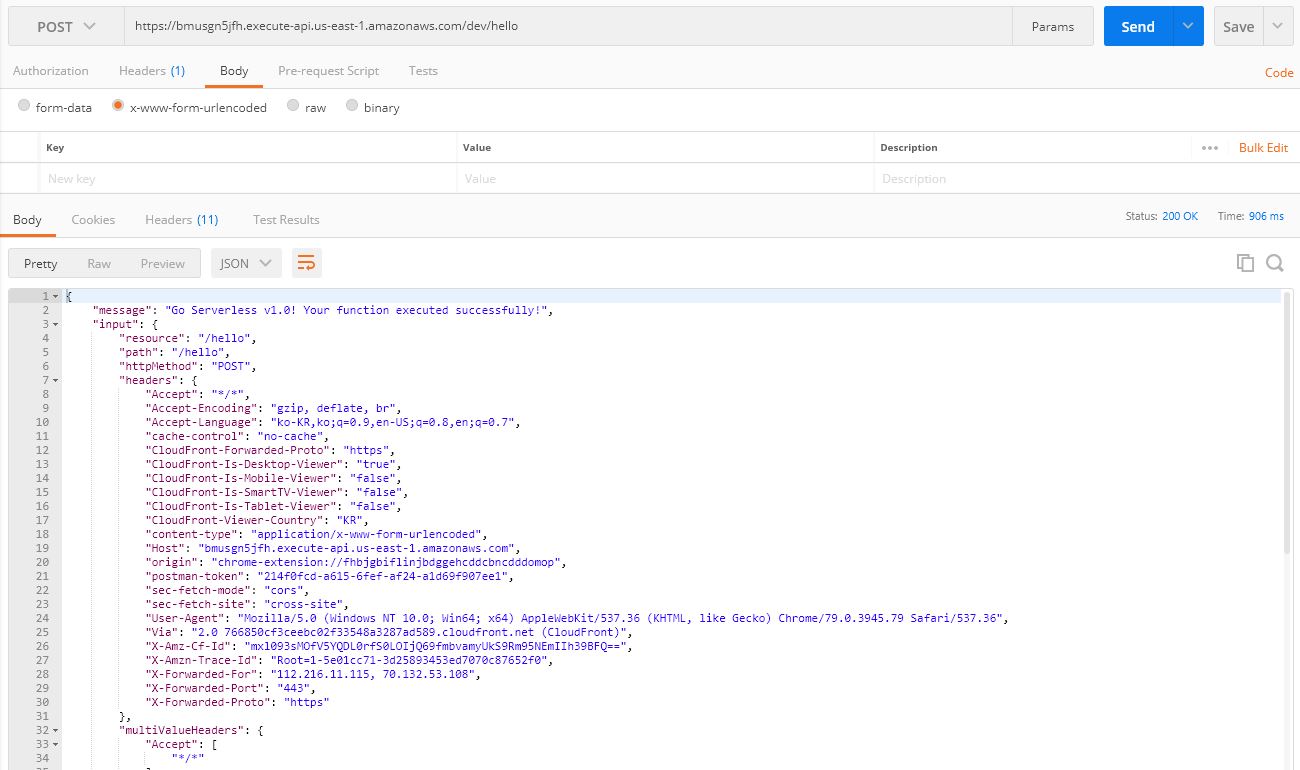
5. endpoint 호출 테스트 (path: hello , method: post)
6. 모니터링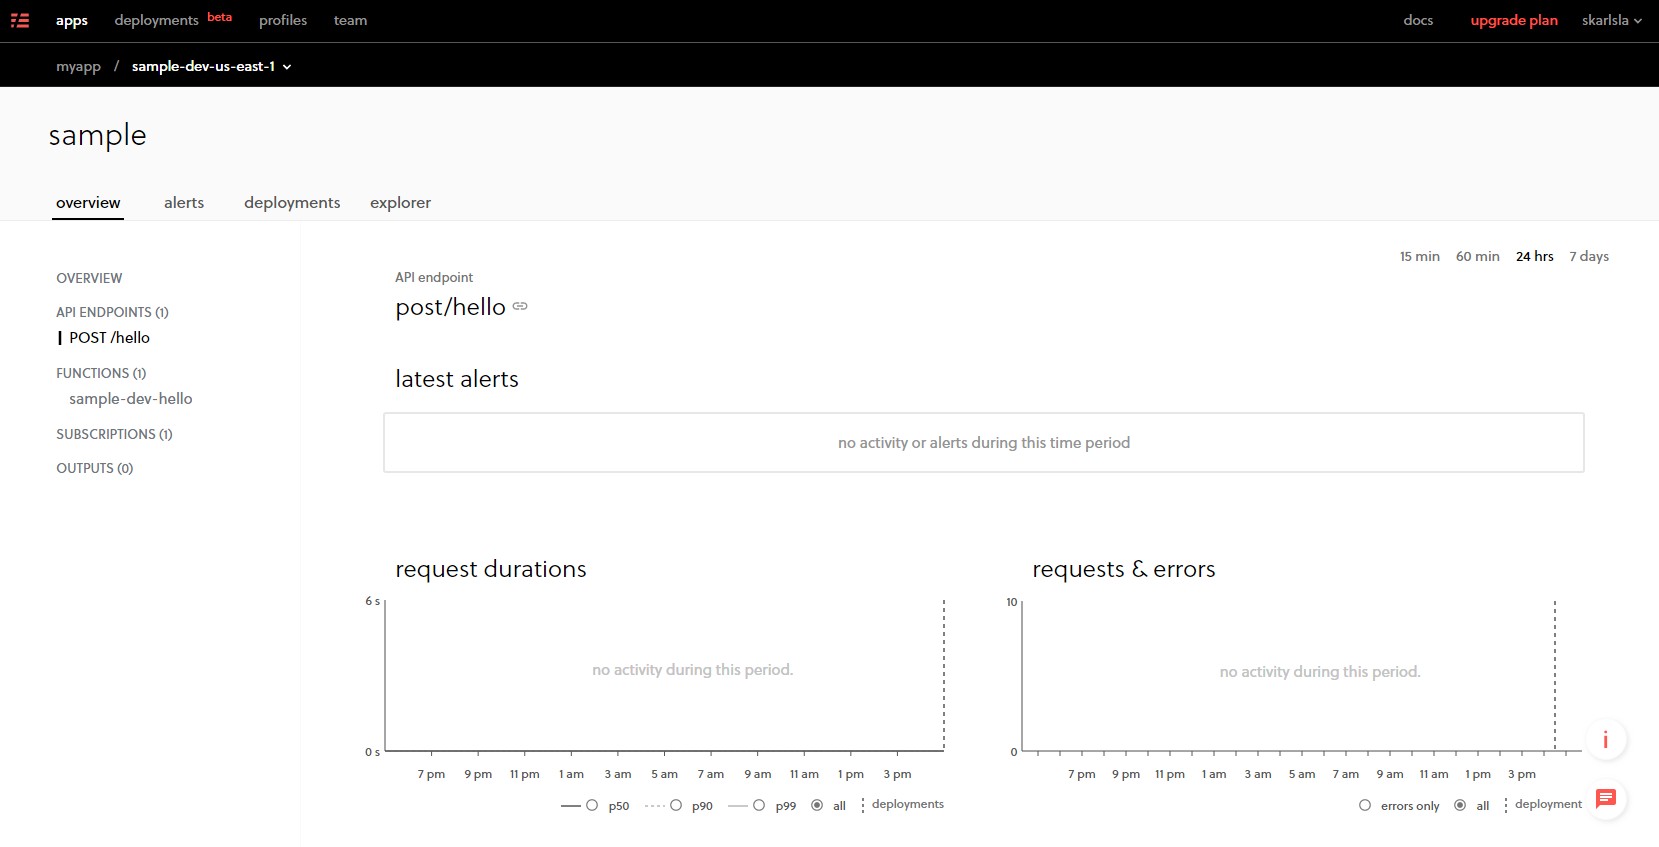
7. invoke service function 호출1
2
3
4
5serverless invoke -f hello -l
{
"statusCode": 200,
"body": "{\n \"message\": \"Go Serverless v1.0! Your function executed successfully!\",\n \"input\": {}\n}"
}
8. Fetch the function logs(로그 실시간보기 logtail) 서비스 호출시 로그 전송됨1
2
3serverless logs -f hello -t
START RequestId: 119d14e0-0450-4095-b808-e7eca56c4fa7 Version: $LATEST
2019-12-24 17:44:30.511 (+09:00) 119d14e0-0450-4095-b808-e7eca56c4fa7 INFO SERVERLESS_ENTERPRISE {"origin":"sls-agent","schemaVersion":"0.0","timestamp":"2019-12-24T08:44:30.511Z","requestId":"119d14e0-0450-4095-b808-e7eca56c4fa7","type":"transaction","payload":{"schemaType":"s-span","schemaVersion":"0.0","operationName":"s-transaction-function","startTime":"2019-12-24T08:44:30.508Z","endTime":"2019-12-24T08:44:30.511Z","duration":2.69708,"spanContext":{"traceId":"11f9f87782a45a96c;Parent=7e64f99f36e026e6;Sampled=0"},"tags":{"schemaType":"s-transaction-function","schemaVersion":"0.0","timestamp":"2019-12-24T08:44:30.508Z","tenantId":"skarlsla","applicationName":"myapp","serviceName":"sample","stageName":"dev","functionName":"sample-dev-hello","timeout":6,"computeType":"aws.lambda","computeRuntime":"aws.lambda.nodejs.12.13.0","computeRegion":"us-east-1","computeMemorySize":"1024","computeMemoryUsed":"{\"rss\":37830656 중략...
9. 서비스 삭제1
2
3
4
5
6
7
8
9serverless remove
Serverless: Getting all objects in S3 bucket...
Serverless: Removing objects in S3 bucket...
Serverless: Removing Stack...
Serverless: Checking Stack removal progress...
.........................
Serverless: Stack removal finished...
Serverless: Publishing service to the Serverless Dashboard...
Serverless: Successfully published your service to the Serverless Dashboard: https://dashboard.serverless.com/tenants/skarlsla/applications/myapp/services/sample/stage/dev/region/us-east-1
[AWS] SAM 간단한 예제(RESTful API endpoint using Amazon API Gateway)
SAM으로 간단한 예제
1. template.yaml 설정1
2
3
4
5
6
7
8
9
10
11
12
13
14
15
16
17
18
19AWSTemplateFormatVersion: '2010-09-09' #SAM 템플릿
Transform: 'AWS::Serverless-2016-10-31'
Description: A simple backend with a RESTful API endpoint using Amazon API Gateway.
Resources:
hello:
Type: 'AWS::Serverless::Function'
Properties:
Handler: handler.hello #실행 함수
Runtime: nodejs8.10 #node.js 로 실행
CodeUri: . #파일 path
Description: A simple backend with a RESTful API endpoint using Amazon API Gateway.
MemorySize: 512 #function 할당 메모리
Timeout: 10 #호출 타임아웃
Events:
Api1:
Type: Api #api gateway
Properties:
Path: /hello #API호출경로
Method: ANY #모든메소드
2. handler.js1
2
3
4
5
6
7
8
9
10
11
12
13
14
15
16
17
18
19
20
21
22
23
24
25
26
27
28
29
30
31;
// apigateway 에서 호출시 진입점(hello)
exports.hello = (event, context, callback) => {
//console.log('Received event:', JSON.stringify(event, null, 2));
switch (event.httpMethod) {
case 'DELETE':
sendResponse(200, 'DELETE happened', callback);
break;
case 'GET':
sendResponse(200, 'GET happened', callback);
break;
case 'POST':
sendResponse(200, 'POST happened', callback);
break;
case 'PUT':
sendResponse(200, 'PUT happened', callback);
break;
default:
sendResponse(200, `Unsupported method "${event.httpMethod}"`, callback);
}
};
function sendResponse(statusCode, message, callback){
const response = {
statusCode: statusCode,
body: JSON.stringify(message)
};
callback(null,response);
}
3. S3 bucket 생성
aws 설치 및 config 설정 생략…1
2aws s3 mb s3://sam-test-bucket3
make_bucket: sam-test-bucket3
4. Packing Artifacts1
2
3
4aws cloudformation package --template-file .\template.yml --s3-bucket sam-test-bucket3 --output-template.yaml
Uploading to 7e7043603cb391e49a966292b19ddcf0 42386 / 42386.0 (100.00%)
Successfully packaged artifacts and wrote output template to file packaged-template.yaml.
Execute the following command to deploy the packaged template
output-template.yaml 에 codeUri가 변경됨 S3의 위치로
5. 배포(Deploy)1
2
3
4
5aws cloudformation deploy --template-file .\packaged-template.yaml --stack-name sam-test-basic3 --capabilities CAPABILITY_IAM
Waiting for changeset to be created..
Waiting for stack create/update to complete
Successfully created/updated stack - sam-test-basic3
6. 생성된 cloudFormation STACK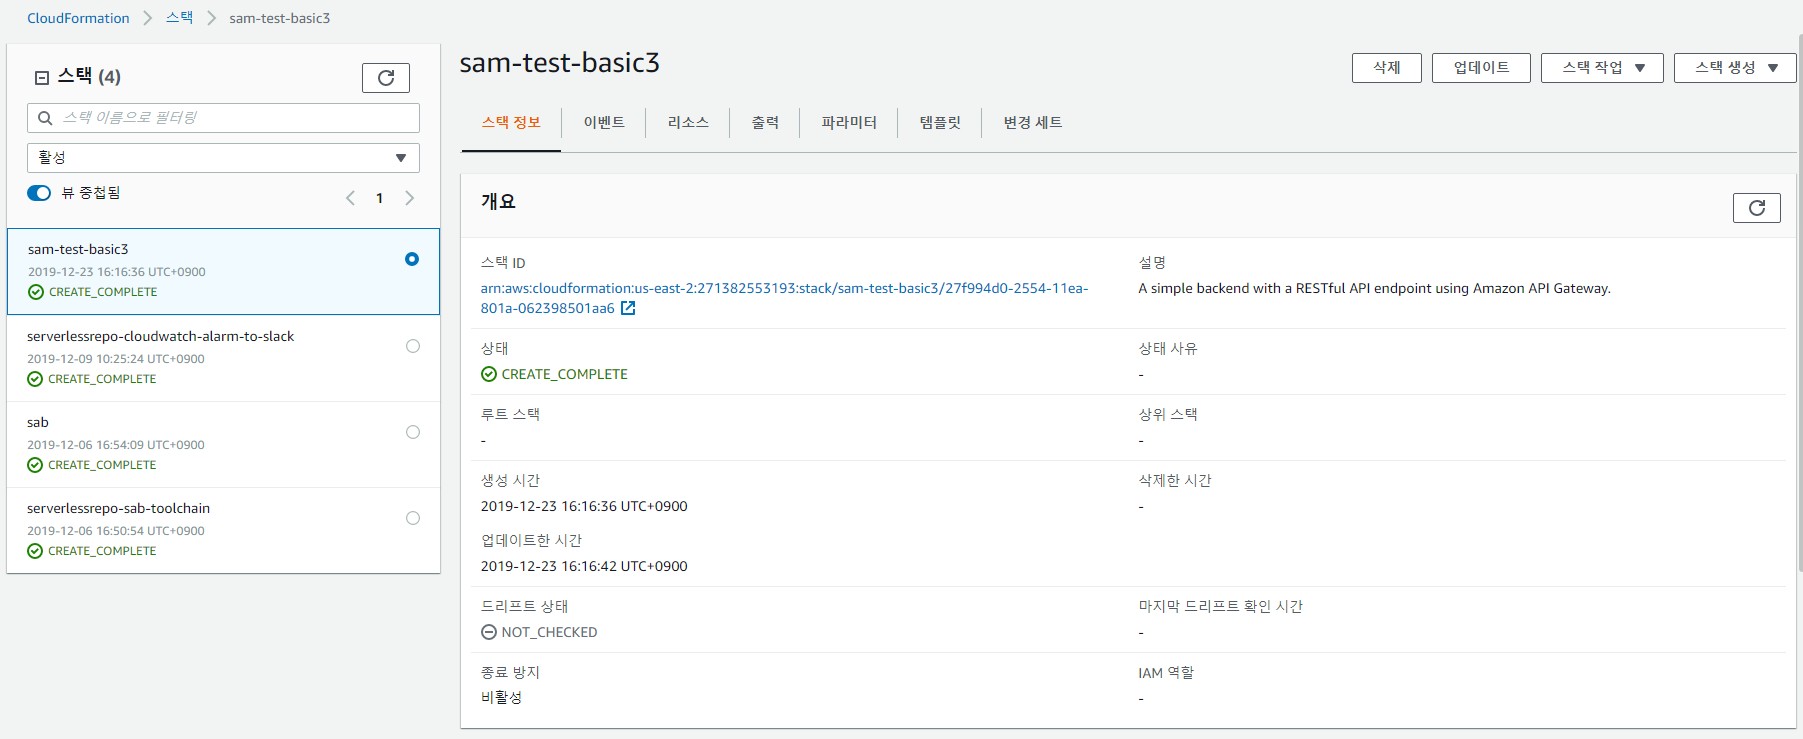
7. 생성된 STACK RESOURCE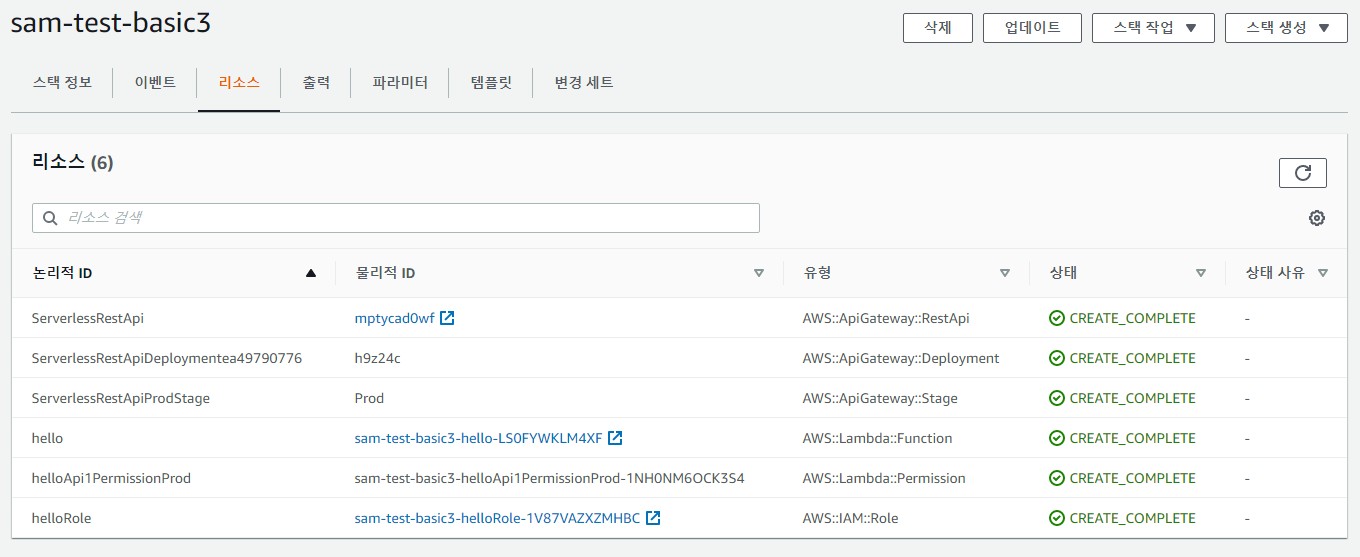
8. 생성된 Template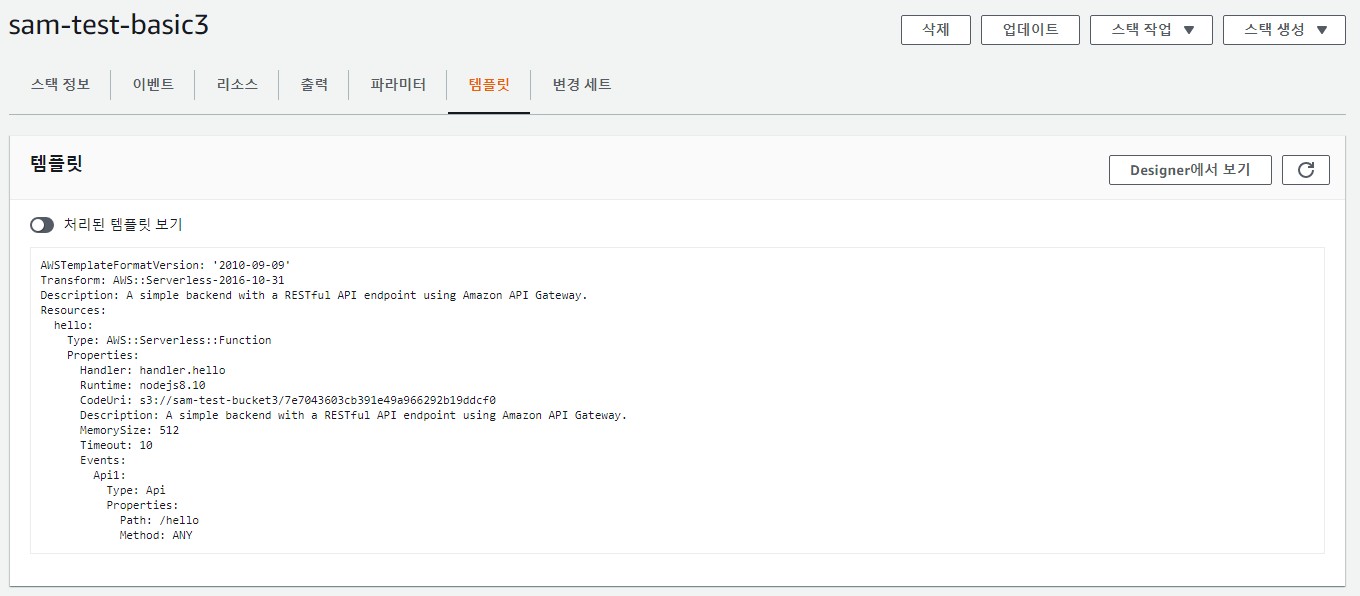
9. 생성된 API GATEWAY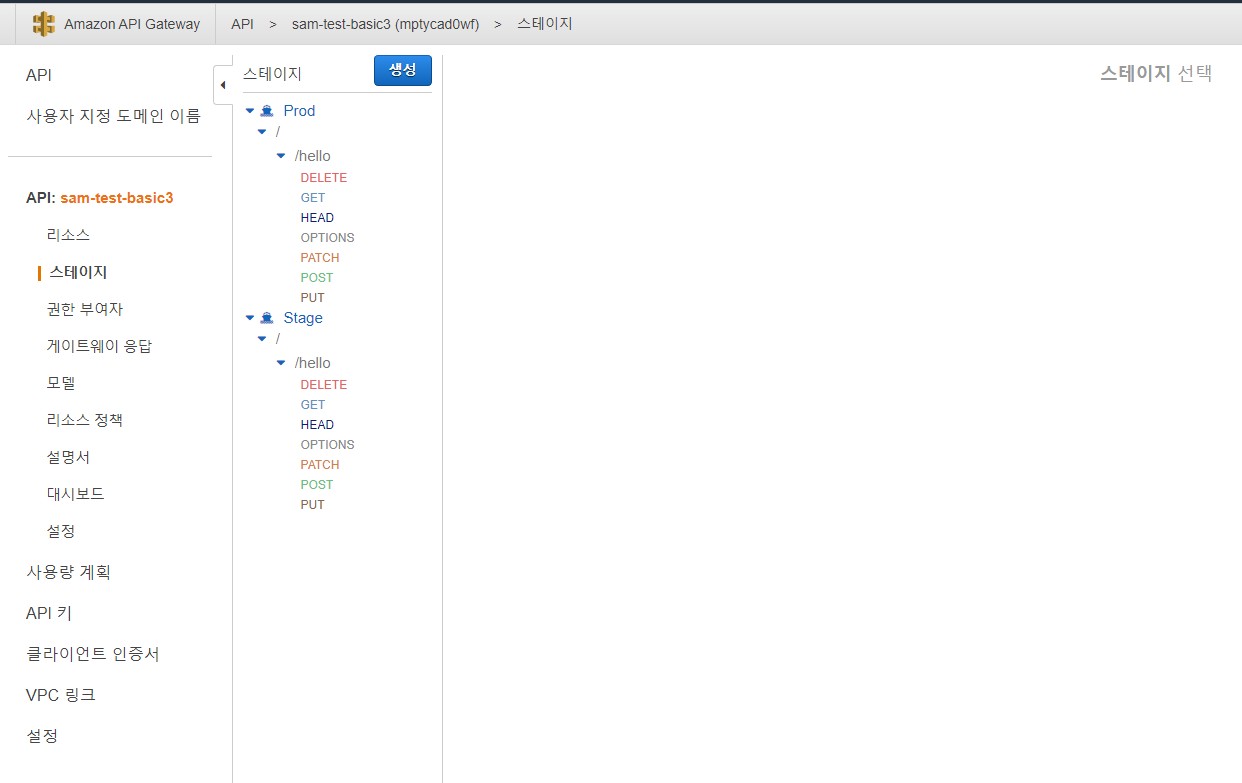
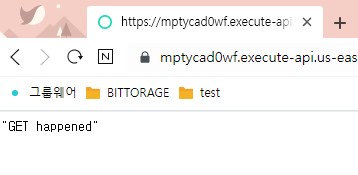
10. API 호출정보 및 호출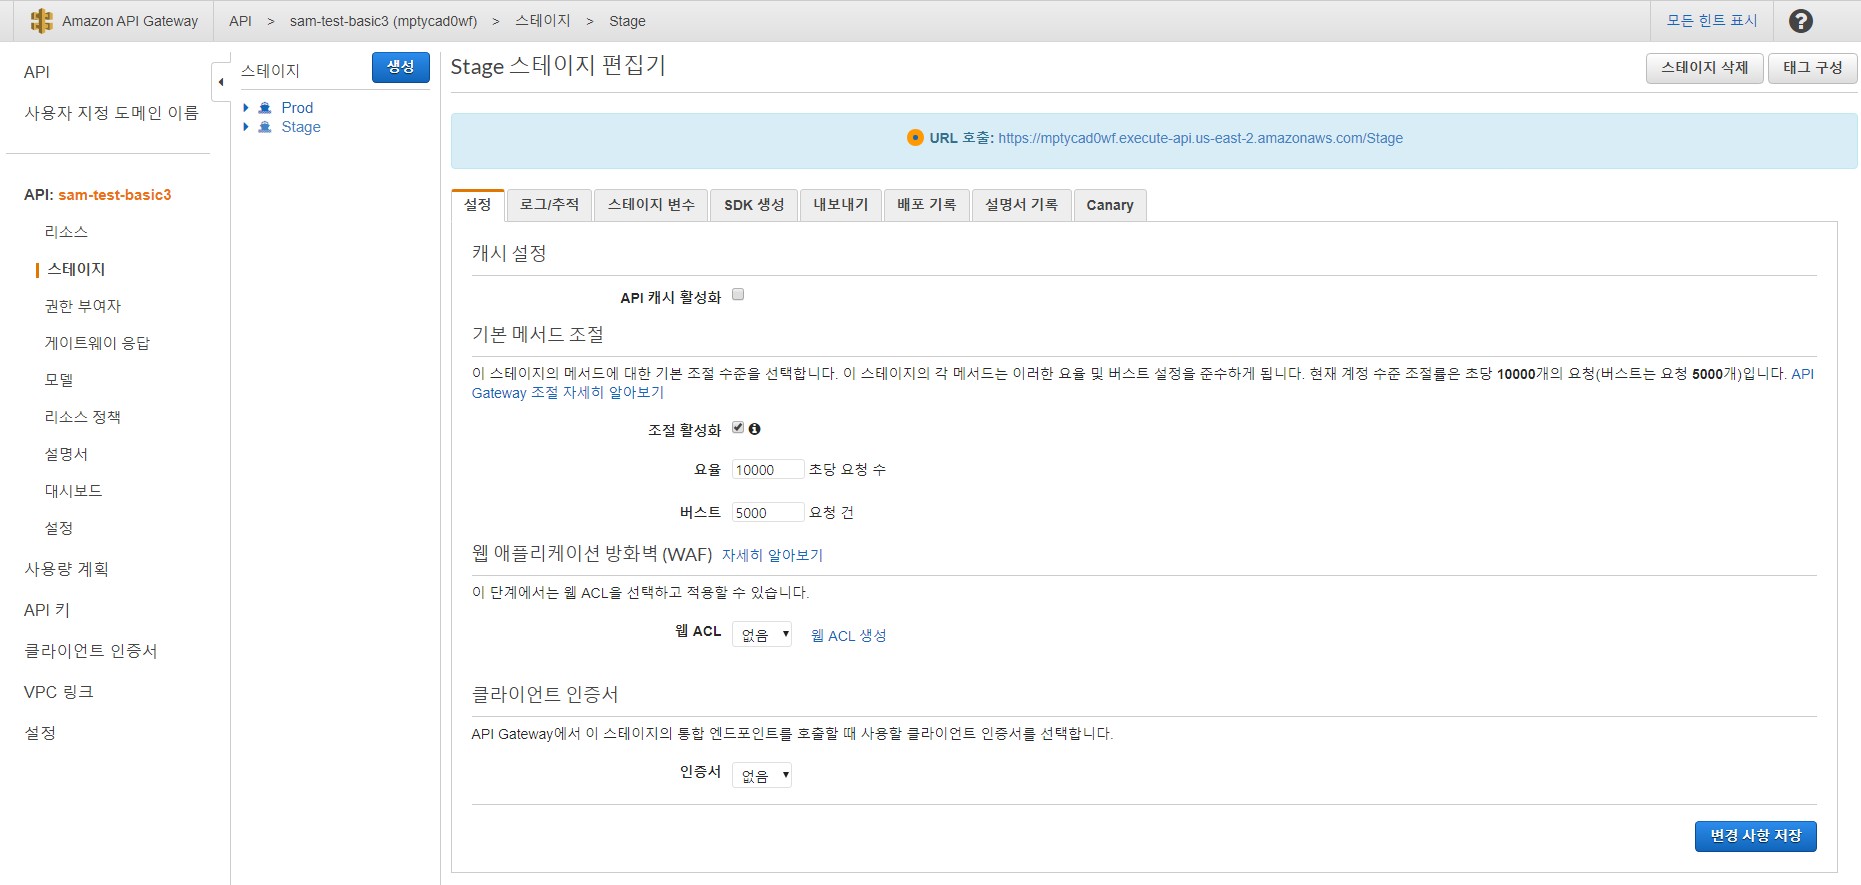
11. 삭제1
aws --region us-east-2 cloudformation delete-stack --stack-name sam-test-basic3
[AWS] CloudWatch Alarms to Slack(로그 에러메세지 슬랙으로 알림)
SAM ?
AWS에서 서버리스 애플리케이션을 빌드하는 데 사용할 수 있는 오픈 소스 프레임워크입니다.
Lambda 함수, 이벤트 소스 및 기타 리소스의 조합.
굳이 힘들게 만들지 않아도 기본적인 앱들이 많다.
그중에 cloudwatch to slack 을 이용해서 해본다.
lambda -> 어플리케이션 -> 검색 serverlessrepo-cloudwatch-alarm-to-slack
slack incoming webhook
미리 생성
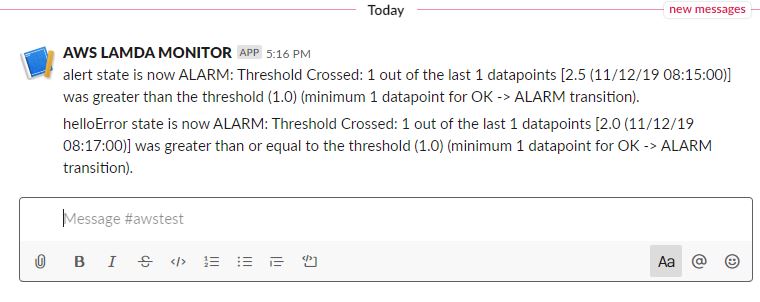
CloudWatch Alarms to Slack
흐름?
그림상 CPU로 했지만 이번엔 특정 람다함수의 에러로그시 알람을 받아보기로함.
1. SAM을 이용해서 앱 생성
2. 생성된 리소스 확인해보자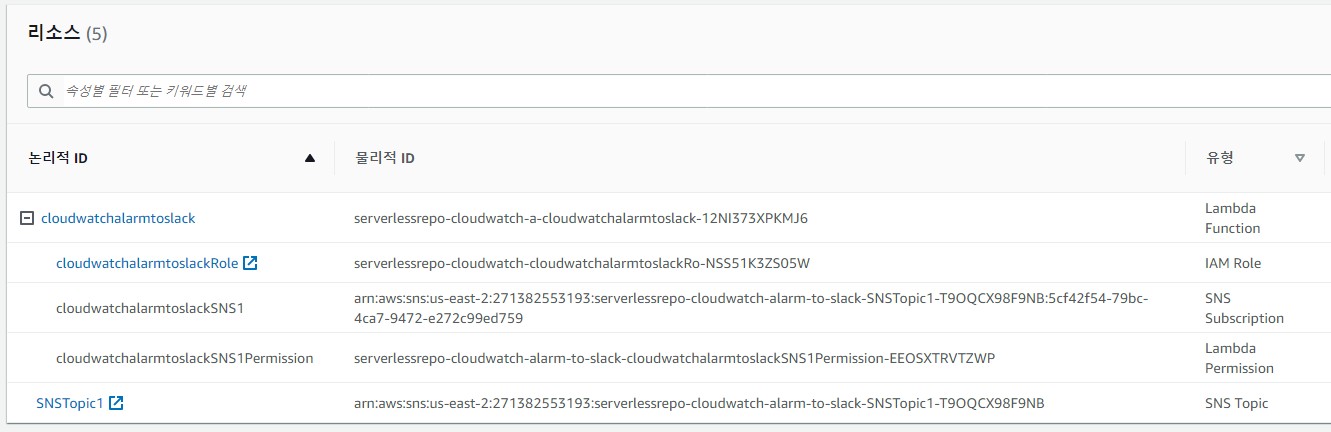
SAM이 아니였다면 일일이 수작업을 해야한다.
SNS Topic, Role, Lambda function & permission & SNS연결
3. Lambda이벤트소스
이벤트 -> 슬랙 메세지 전송
이벤트 파라미터를 통해 채널별로 별도로 전송도 가능하겠다.
1 | function processEvent(event, callback) { |
4. 앱 환경변수
웹훅 url을 KMS로 암호화해서 넣어야한다.
알람을 받을 채널명을 입력한다.
5. KMS로 암호화
aws kms로 이동 후 kms 생성
작업PC에 aws-cli를 설치하고 sdk config를 설정한후 (key, secret, region )
암호화 명령어(웹훅 주소는 https://는 빼고한다.)1
2
3
4
5
6aws kms encrypt --key-id "alias/firstKey" --plaintext hooks.slack.com/services/T919NHKHQ/BRC2C9JTW/AWHkTB9tqxxxx
{
"CiphertextBlob": "AQICAHjZAWxDFIzL7Oag6zTm7iWRjsIxxxxxgEJyyQbbCYC6gzchcB1MLs6AAAApzCBpAYJKoZIhvcNAQcGoIGWMIGTAgEAMIGNBgkqhkiG9w0BBwEwHgYJYIZIAWUDBAEuMBEEDMlBSyOT7QHDEM8sLAIBEIBgFilgF7ONYEgiiiM4yxz+Iy8TkbzFlOiDoa79s4z................................+HWPErBuwGtje3bwfmoRCL1D24aosHuW8lekMJUqF0SqdlmGuxxxxx",
"KeyId": "arn:aws:kms:us-east-2:271382xxxxxx193:key/ab9a5099-01aa-46dc-b284-xxxxxx",
"EncryptionAlgorithm": "SYMMETRIC_DEFAULT"
}
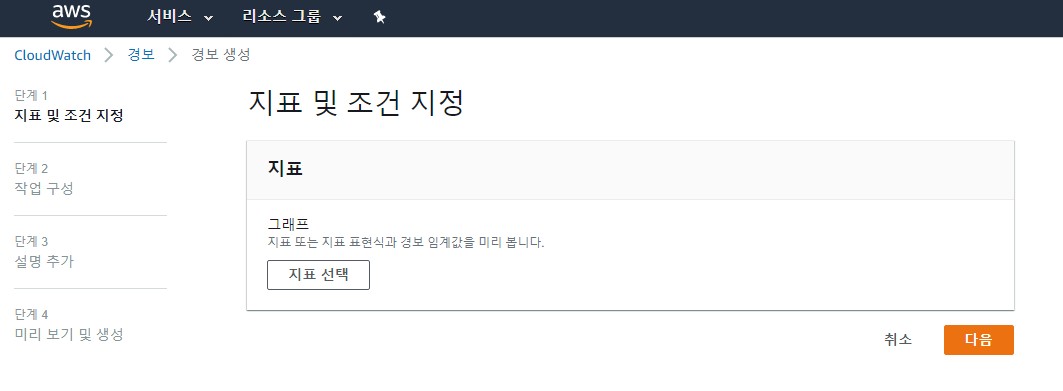
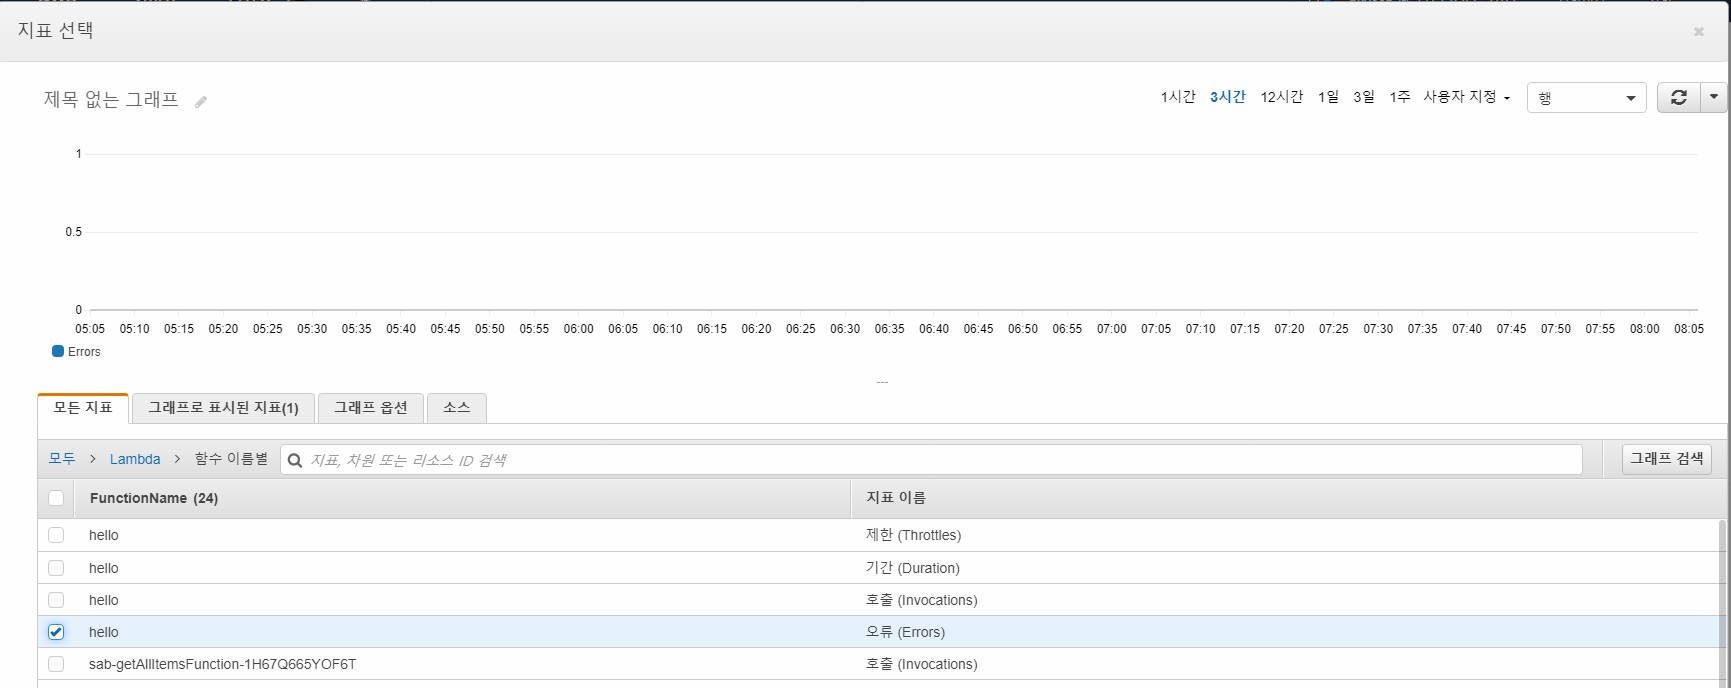
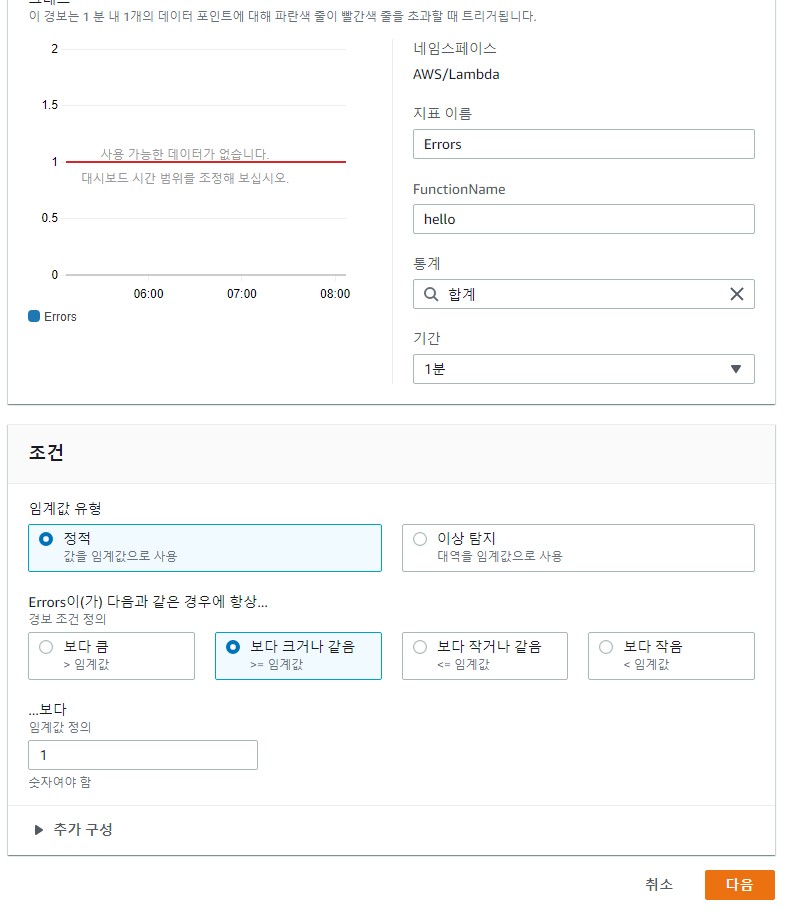
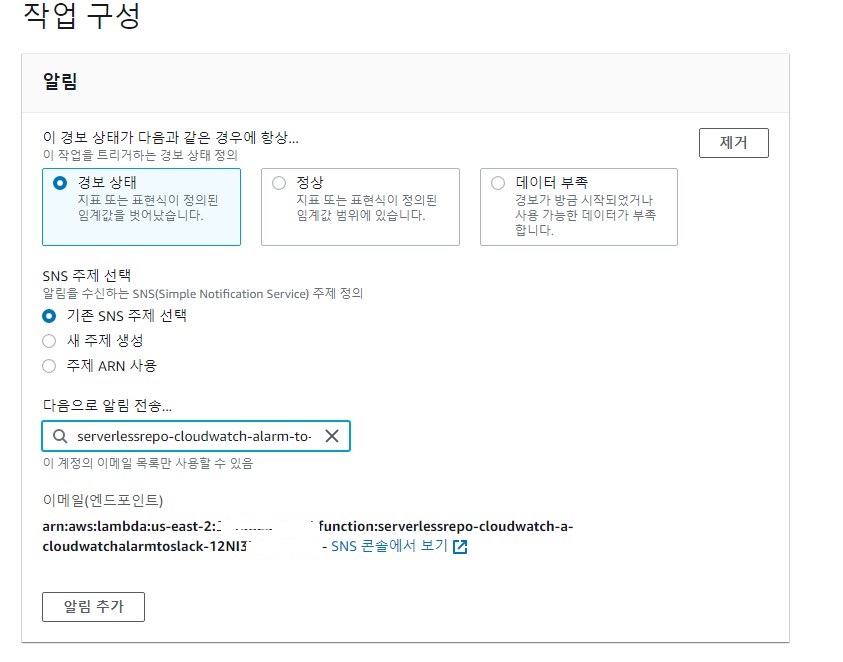
6. CloudWatch Alert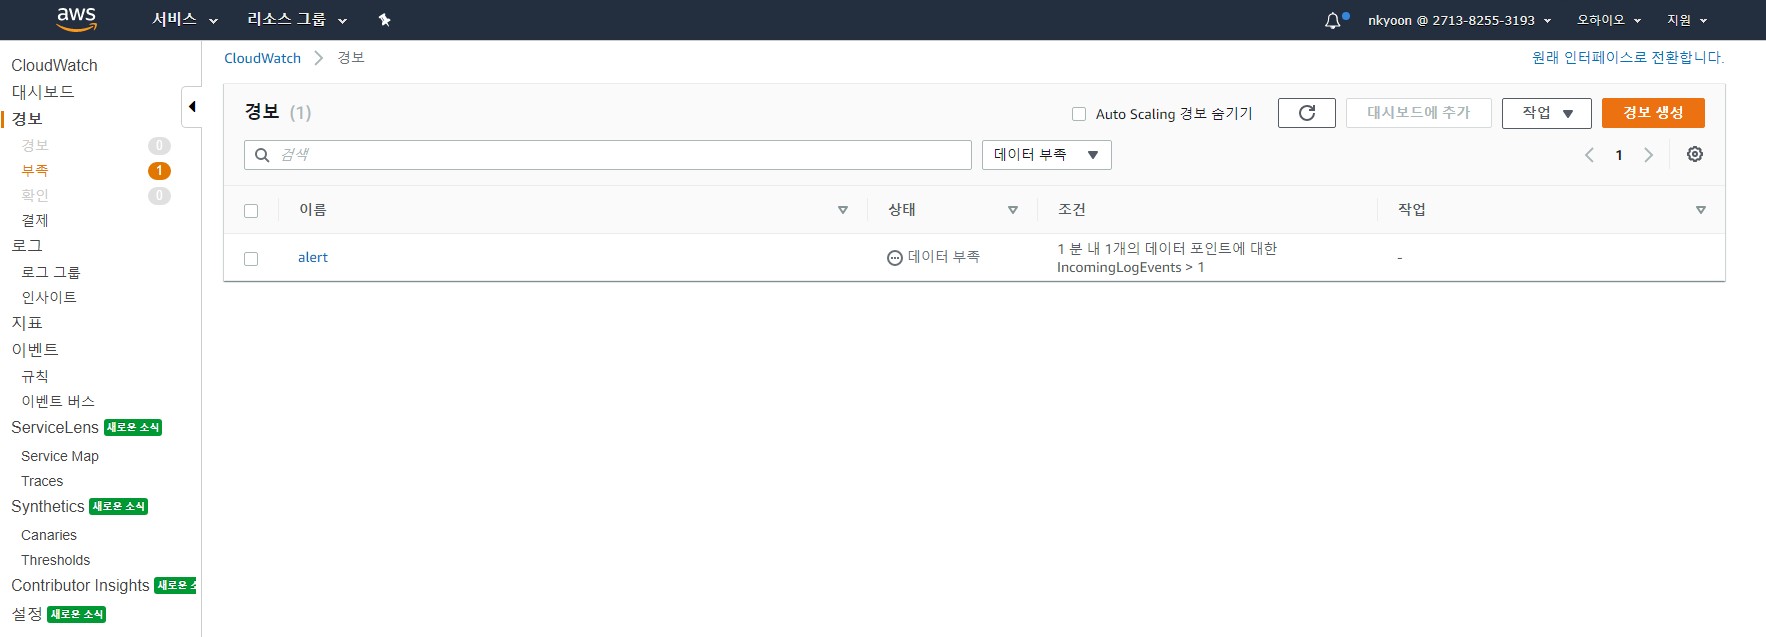
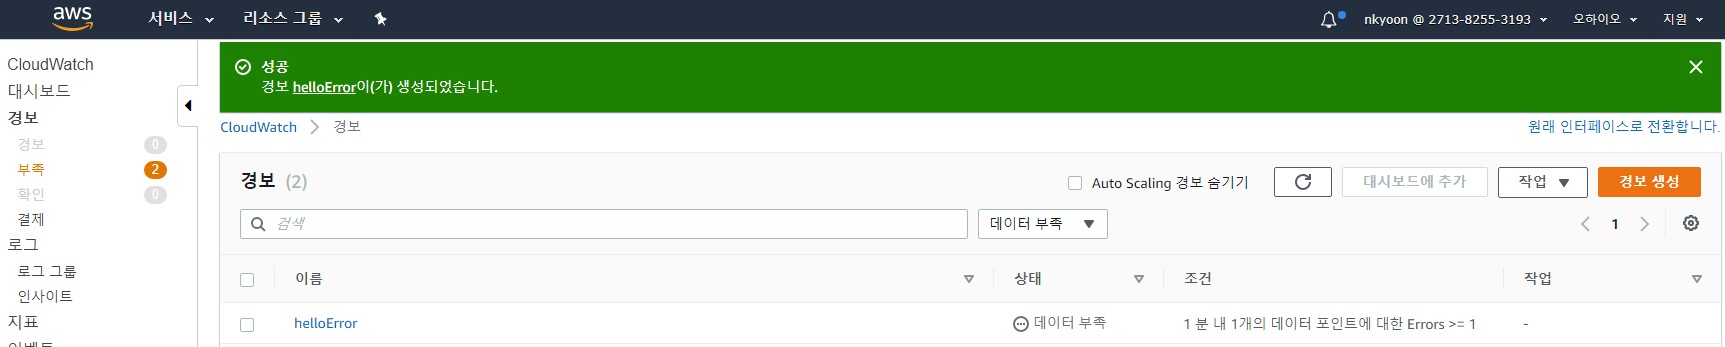
7. 경보호출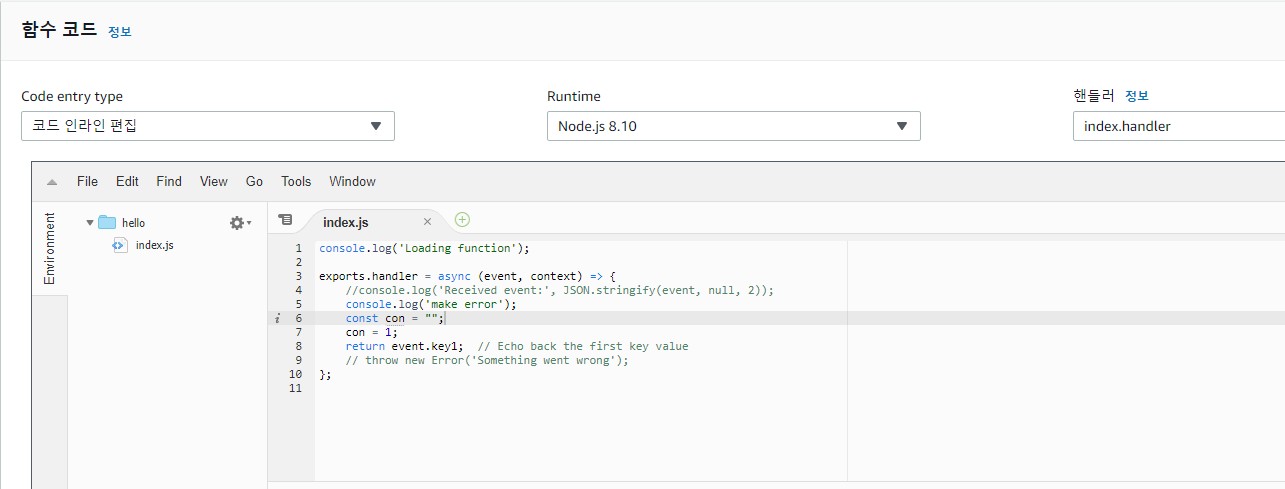
소스수정으로 hello function실행시 error로그가 발생하도록 수정
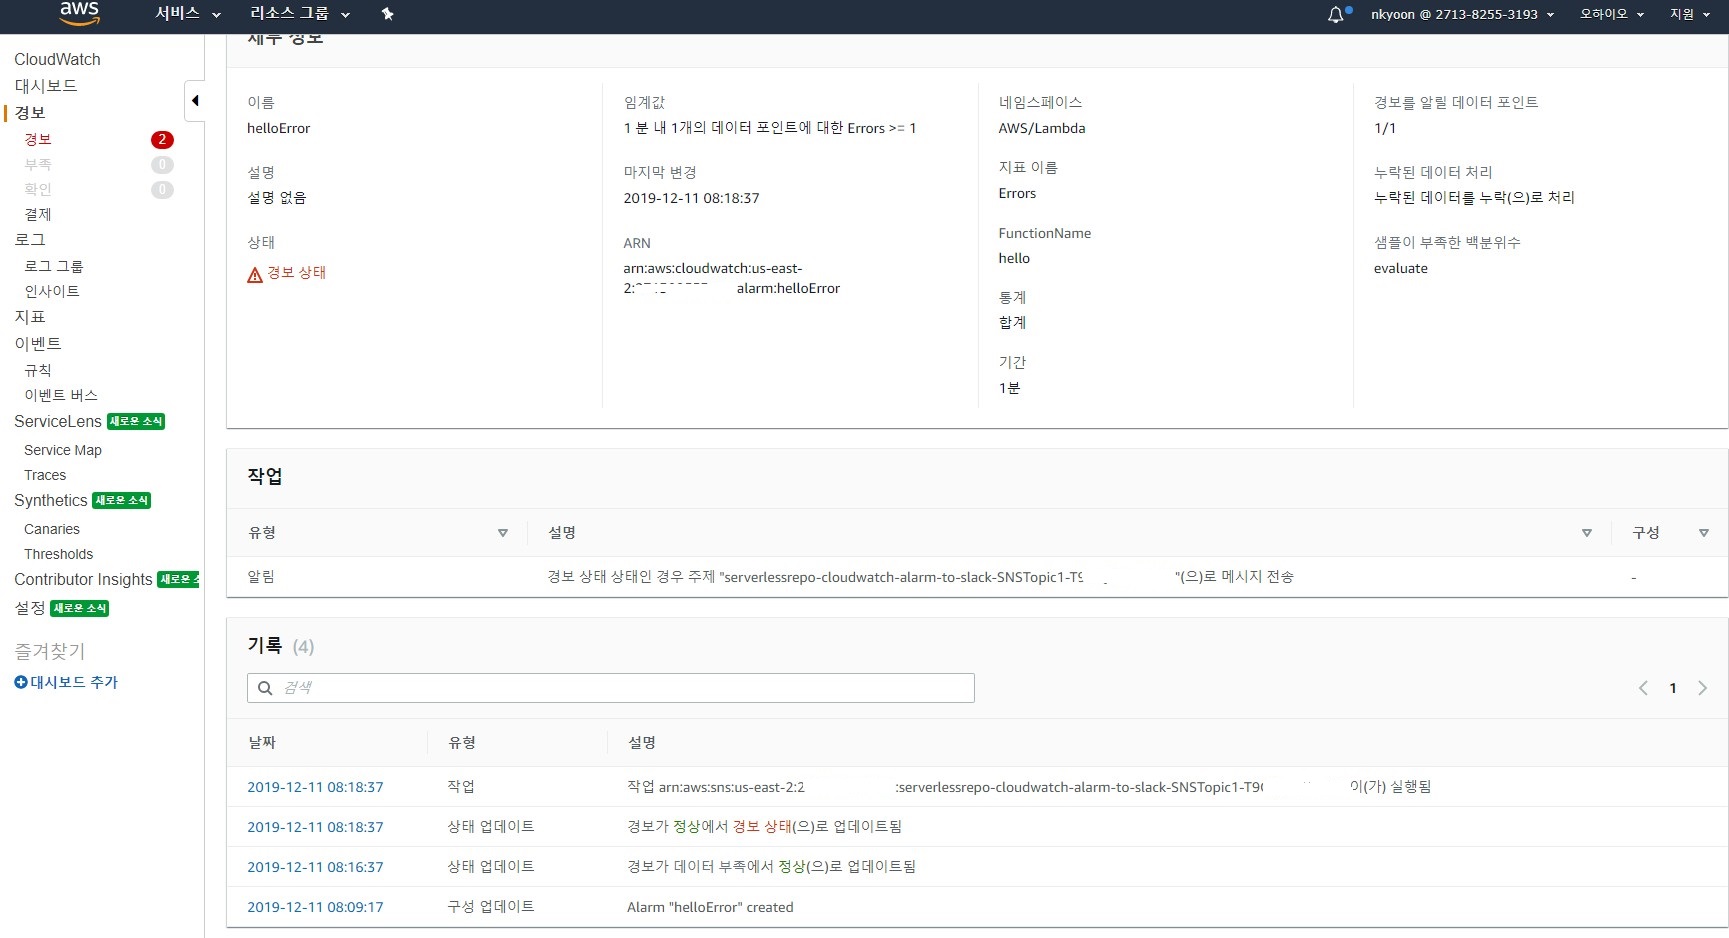
8. 슬랙 채널 확인